Copyright Ted Nissen March 2003
1 Shoulder and Shoulder Girdle
1 Shoulder and Shoulder Girdle
Back
Table of Contents References
1.1
Kessler 189-194
1.1.1
History
1.1.1.1
Questions
1.1.1.1.1
Pain Spread below Elbow?
1.1.1.1.2
Patient able to lie on the
shoulder at night?
1.1.1.1.3
Able to use arm to comb
hair?
1.1.1.1.4
Reach hip pocket or fasten
bra behind?
1.1.1.1.5
Eat comfortably with arm?
1.1.1.1.6
Hurt to put on or remove
Shirt or jacket?
1.1.1.1.7
Difficulty reaching above
shoulder level?
1.1.1.2
Site of Pain
1.1.1.2.1
Pain refers over lateral
brachial region
1.1.1.2.2
Pain felt in C5 (Glenohumeral)
segment or C4 (Acromioclavicular) sclerotome.
1.1.1.3
Nature of Pain
1.1.1.3.1
1.1.1.4
Onset of Pain
1.1.1.4.1
1.1.1.5
General Health
1.1.1.5.1
1.1.2
Physical
Examination
1.1.2.1
Observation
1.1.2.1.1
1.1.2.2
Inspection
1.1.2.2.1
1.1.2.3
Selective Tissue
Tension Tests
1.1.2.3.1
Active Movements (Sitting)
1.1.2.3.1.1
1.1.2.3.2
Passive Movements (Supine)
1.1.2.3.2.1
1.1.2.3.3
Resisted Isometric Movements
(Supine)
1.1.2.3.3.1
1.1.2.3.4
Joint-Play Movements
(Supine)
1.1.2.3.4.1
1.1.2.4
Neuromuscular
Tests
1.1.2.4.1
1.1.2.5
Palpation
1.1.2.5.1
Skin
1.1.2.5.1.1
1.1.2.5.2
Soft Tissues
1.1.2.5.2.1
1.1.2.5.3
Bones and Soft-Tissue
attachments
1.1.2.5.3.1
1.1.2.6
Special Tests
1.1.2.6.1
Locking Test
1.1.2.6.1.1
Locking
Test
1.1.2.6.2
Quadrant Test
1.1.2.6.2.1
Quadrant
Test
1.1.2.6.3
Anterior Stability Test
1.1.2.6.3.1
Anterior
Stability Test
1.1.2.6.4
Impingement Syndrome Test
1.1.2.6.4.1
Impingement
Syndrome Test
1.1.2.6.5
Bicipital Tendinitis Test
1.1.2.6.5.1
Bicipital
Tendinitis Test
1.1.2.7
Miscellaneous
1.1.2.7.1
1.1.2.8
Ancillary Tests
1.1.2.8.1
1.2
Cyriax 33-36
1.2.1
Referred Pain
1.2.1.1
1.2.2
History
1.2.2.1
1.2.3
Examination
1.2.3.1
1.2.3.2
Active and
Passive Movements
1.2.3.2.1
1.2.3.3
Mechanism of Arm
Elevation
1.2.3.3.1
1.2.3.4
Resisted
Movements
1.2.3.4.1
1.3
Hoppenfeld 1-34
1.3.1
1.3.2
Inspection
1.3.3
1.3.4
Bony Palpation
1.3.4.1.1
1.3.4.2
Suprasternal
Notch
1.3.4.2.1
1.3.4.3
Sternoclavicular
Joint
1.3.4.3.1
1.3.4.4
Clavicle
1.3.4.4.1
1.3.4.5
Coracoid Process
1.3.4.5.1
1.3.4.6
Acromioclavicular
Articulation
1.3.4.6.1
1.3.4.7
Acromion
1.3.4.7.1
1.3.4.8
Greater
Tuberosity of the Humerus
1.3.4.8.1
1.3.4.9
Bicipital Groove
1.3.4.9.1
1.3.4.10
Spine of the
Scapula
1.3.4.10.1
1.3.4.11
Vertebral Border
of the Scapula
1.3.4.11.1
1.3.5
Soft Tissue
Palpation by Clinical Zones
1.3.5.1
1.3.5.2
Zone 1 Rotator
Cuff
1.3.5.2.1
1.3.5.3
Zone 2
Subacromial and Subdeltoid Bursa
1.3.5.3.1
1.3.5.4
Zone 3 Axilla
1.3.5.4.1
1.3.5.5
Zone 4 Prominent
Muscles of the Shoulder Girdle
1.3.5.5.1
1.3.5.5.2
Sternocleidomastoid
1.3.5.5.2.1
1.3.5.5.3
Pectoralis Major
1.3.5.5.3.1
1.3.5.5.4
Biceps
1.3.5.5.4.1
1.3.5.5.5
Deltoid
1.3.5.5.5.1
1.3.5.5.6
Trapezius
1.3.5.5.6.1
1.3.5.5.7
Rhomboid Minor and Major
1.3.5.5.7.1
1.3.6
Range of Motion
1.3.6.1
1.3.6.2
Active Range of
Motion Tests
1.3.6.2.1
1.3.6.3
Passive Range of
Motion Tests
1.3.6.3.1.1
1.3.6.3.2
Abduction=180 Adduction=45
1.3.6.3.2.1
1.3.6.3.3
Flexion=90 Extension=45
1.3.6.3.3.1
1.3.6.3.4
Internal Rotation=55
External Rotation=40-45
1.3.6.3.4.1
1.3.7
Neurologic
Examination
1.3.7.1
1.3.7.2
Muscle Testing
1.3.7.2.1
1.3.7.2.2
Flexion
1.3.7.2.2.1
1.3.7.2.3
Extension
1.3.7.2.3.1
1.3.7.2.4
Abduction
1.3.7.2.4.1
1.3.7.2.5
Adduction
1.3.7.2.5.1
1.3.7.2.6
External Rotation
1.3.7.2.6.1
1.3.7.2.7
Internal Rotation
1.3.7.2.7.1
1.3.7.2.8
Scapular Elevation
1.3.7.2.8.1
1.3.7.2.9
Scapular Retraction
1.3.7.2.9.1
1.3.7.2.10
Scapular Protraction
1.3.7.2.10.1
1.3.7.3
Reflex Testing
1.3.7.3.1
1.3.7.4
Sensation
Testing
1.3.7.4.1
1.3.8
Special Tests
1.3.8.1
1.3.8.2
Yergason’s Test
1.3.8.2.1
Yergason’s
Test
1.3.8.3
Drop Arm Test
1.3.8.3.1
Drop
Arm Test
1.3.8.4
Apprehension
Test for Shoulder Dislocation
1.3.8.4.1
Apprehension
Test
1.3.8.5
Examination of
related Areas
1.3.8.5.1
1.4 Wheeless' Textbook of Orthopaedics
1.4.1 http://www.ortho-u.net/o6/37.htm
2 Elbow
Back Table of Contents References
2.1
Kessler 215-216
2.1.1
History
2.1.1.1
Questions
2.1.1.1.1
2.1.2
Physical
Examination
2.1.2.1
Observation
2.1.2.1.1
2.1.2.2
Inspection
(Include Entire Extremity)
2.1.2.2.1 Structure
2.1.2.2.1.1
2.1.2.2.2 Soft Tissue
2.1.2.2.2.1
2.1.2.2.3 Skin
2.1.2.2.3.1
2.1.2.3
Selective Tissue
Tension Tests
2.1.2.3.1 Active Movements
(Sitting)
2.1.2.3.1.1
2.1.2.3.2 Passive Movements
(Supine for Optimal Stabilization)
2.1.2.3.2.1
2.1.2.3.3 Joint Play Movements
2.1.2.3.3.1
2.1.2.3.4 Resisted Isometric
Movements (Supine)
2.1.2.3.4.1
2.1.2.4
Palpation
2.1.2.4.1 Skin
2.1.2.4.1.1
2.1.2.4.2 Subcutaneous Soft
Tissues
2.1.2.4.2.1
2.1.2.4.3 Bones
2.1.2.4.3.1
2.1.2.5
Other
2.1.2.5.1
2.2
Cyriax 51-52
2.2.1
Referred Pain
2.2.1.1
2.2.2
Examination
2.2.2.1
2.2.2.2
Passive
Movements
2.2.2.2.1
2.2.2.3
Resisted
Movements
2.2.2.3.1
2.3
Hoppenfeld 35-57
2.3.1
2.3.2
Inspection
2.3.2.1
Carrying Angle
2.3.2.1.1
2.3.2.1.2
Cubitus Valgus
2.3.2.1.2.1
2.3.2.1.3
Cubitus Varus
2.3.2.1.3.1
2.3.2.2
Swelling
2.3.2.2.1
2.3.2.3
Scars
2.3.2.3.1
2.3.3
Bony Palpation
2.3.3.1
2.3.3.2
Medial
Epicondyle
2.3.3.2.1
2.3.3.3
Medial
Supracondylar Line of the Humerus
2.3.3.3.1
2.3.3.4
Olecranon
2.3.3.4.1
2.3.3.5
Ulnar Border
2.3.3.5.1
2.3.3.6
Olecranon Fossa
2.3.3.6.1
2.3.3.7
Lateral
Epicondyle
2.3.3.7.1
2.3.3.8
Lateral
Supracondylar Line of the Humerus
2.3.3.8.1
2.3.3.9
Radial Head
2.3.3.9.1
2.3.4
Soft Tissue
Palpation
2.3.4.1
2.3.4.2
Zone 1 Medial
Aspect
2.3.4.2.1
2.3.4.2.2
Ulnar Nerve
2.3.4.2.2.1
2.3.4.2.3
Wrist Flexor-Pronator
Muscle Group
2.3.4.2.3.1
2.3.4.2.3.2
Pronator Teres
2.3.4.2.3.2.1
2.3.4.2.3.3
Flexor Carpi Radialis
2.3.4.2.3.3.1
2.3.4.2.3.4
Palmaris Longus
2.3.4.2.3.4.1
2.3.4.2.3.5
Flexor Carpi Ulnaris
2.3.4.2.3.5.1
2.3.4.2.4
Medial Collateral Ligament
2.3.4.2.4.1
2.3.4.2.5
Supracondylar Lymph Nodes
2.3.4.2.5.1
2.3.4.3
Zone 2 Posterior
Aspect
2.3.4.3.1
Olecranon Bursa
2.3.4.3.1.1
2.3.4.3.2
Triceps Muscle
2.3.4.3.2.1
2.3.4.4
Zone 3 Lateral
Aspect
2.3.4.4.1
Wrist Extensors
2.3.4.4.1.1
2.3.4.4.2
Brachioradialis
2.3.4.4.2.1
2.3.4.4.3
Extensor Carpi Radialis
Longus and Brevis
2.3.4.4.3.1
2.3.4.4.4
Lateral Collateral Ligament
2.3.4.4.4.1
2.3.4.4.5
Annular Ligament
2.3.4.4.5.1
2.3.4.5
Zone 4 Anterior
Aspect
2.3.4.5.1
Cubital Fossa
2.3.4.5.1.1
2.3.4.5.2
Biceps Tendon
2.3.4.5.2.1
2.3.4.5.3
Brachial Artery
2.3.4.5.3.1
2.3.4.5.4
Median Nerve
2.3.4.5.4.1
2.3.4.5.5
Musculocutaneous Nerve
2.3.4.5.5.1
2.3.5
Range of Motion
2.3.5.1
2.3.5.2
Active Range of
Motion Tests
2.3.5.2.1
2.3.5.2.2
Flexion=135 +
2.3.5.2.2.1
2.3.5.2.3
Extension=0/-5
2.3.5.2.3.1
2.3.5.2.4
Supination=90
2.3.5.2.4.1
2.3.5.2.5
Pronation=90
2.3.5.2.5.1
2.3.5.3
Passive Range of
Motion Tests
2.3.5.3.1
2.3.5.3.2
Flexion and Extension
2.3.5.3.2.1
2.3.5.3.3
Supination and Pronation
2.3.5.3.3.1
2.3.6
Neurologic
Examination
2.3.6.1
2.3.6.2
Muscle Testing
2.3.6.2.1
2.3.6.3
Reflex Testing
2.3.6.3.1
2.3.6.3.2
Biceps Reflex=C5
2.3.6.3.2.1
2.3.6.3.3
Brachio0radialis Reflex=C6
2.3.6.3.3.1
2.3.6.3.4
Triceps Reflex=C7
2.3.6.3.4.1
2.3.6.4
Sensation
Testing
2.3.6.4.1
2.3.7
Special Tests
2.3.7.1
Test for
Ligamentous Stability
2.3.7.1.1
Ligamentous
Stability
2.3.7.2
Tinel Sign
2.3.7.2.1
Tinel
Sign
2.3.7.3
Tennis Elbow
Test
2.3.7.3.1
Tennis
Elbow Test
2.3.8
Examination of
Related Areas
2.3.8.1
2.4 Wheeless' Textbook of Orthopaedics
2.4.1
http://www.ortho-u.net/oo3/142.htm
3 Wrist and Hand
Back
Table of Contents References
4 Knee
Back
Table of Contents References
5 Foot and Ankle
Back
Table of Contents References
5.1 Introduction to Examination
5.1.1 The foot and ankle are the focal points to which the focal body weight is transmitted in ambulation, and they are well tailored to that function. The thick heel and toe pads perform as shock absorbers in the acts of walking and running, and the joints are capable of the adjustments necessary for fine balance on a variety of terrain.
5.1.2 Because of this concentrated stress, the foot and ankle are often involved in static deformities not ordinarily affecting other parts of the body. Moreover, the foot is subject to a high incidence of general systemic conditions, such as rheumatoid arthritis and diabetes.
5.1.3 Since the foot brings man into immediate and direct physical contact with his environment, its constant exposure and susceptibility to injury more or less necessitate an artificial encasement, the shoe, which in itself can cause and compound many foot problems. Therefore, the judicious examination of the foot and ankle includes a careful scrutiny of the patient's footwear.
5.1.4 The L4, L5, S1, and S2 segments contribute to the ankle and foot. Symptoms arising in the more proximal regions of these segments may refer to the ankle and foot, the most common of which might be paresthesias arising from lumbar nerve root irritation. Actual pain of more proximal origin is rarely felt in the foot. Rather, foot and ankle pain usually arises from local pathologic processes. Pain arising from tissues of the foot or ankle maybe referred a short distance proximally but almost never to the knee or above.
5.1.5 The common lesions affecting the ankle are of acute, traumatic onset, whereas those affecting the foot are more likely to be chronic disorders resulting from stress overload. Because of the biomechanical interdependency of the weight-bearing joints, attention must often be directed to the structure and function of more proximally situated joints during examination of patients with chronic or subtle foot disorders, Similarly, examination of the foot may well be in order in patients with disorders affecting more proximal regions.
5.2 History
5.2.1 A patient interview designed to elicit specific information related to the patient's pain, functional status, and other associated symptoms, as set out in Chapter 4, Assessment of Musculoskeletal Disorders, should be carried out. The following are general concepts that apply to information that may be elicited when a therapist interviews patients with common foot or ankle disorders.
5.2.1.1 If the disorder was of an acute, traumatic onset, an attempt can be made to determine the exact mechanism of injury. Plantarflexion-inversion strains are more likely to result in capsuloligamentous injury, whereas forces moving the foot into dorsiflexion and rotation (abduction) are more likely to produce a fracture.
5.2.1.2 If the disorder is of a more chronic nature and of insidious onset, the therapist can attempt to determine whether a change in activity level or footwear may be associated with the onset of the problem. Also inquire about the effect of changing footwear. For example, a therapist might determine the effect of variations in heel height, including whether the problem. is affected for better or for worse by going barefoot.
5.2.1.3
Chronic stress overload (fatigue)
disorders may be classified as
5.2.1.3.1 Those due to high levels of activity in which the frequency or high rate of tissue stress is such that the body is unable to keep up with the increased rate of tissue Microtrauma (the rate of tissue breakdown exceeds the rate of repair and the tissue gradually fatigues) and
5.2.1.3.2 Those that occur with normal activity levels and are due to some structural or biomechanical abnormality that subjects the affected tissue to mildly increased stresses over a long period of time. Such stresses may produce pain on an intermittent basis and, over a long period of time, may induce tissue hypertrophy. Since these are mild stresses acting over a long period, the body is able to respond by laying down an excessive amount of tissue in an attempt to strengthen itself against these abnormal stresses. Tissue hypertrophy such as corns and calluses may, in itself, lead to pain by allowing localized areas of stress concentration.
5.2.1.4 Patients incurring tissue damage from high stresses acting over a relatively short time period are typically persons who have increased their activity level significantly. Often, but not always, the patient will blame a particular activity for contributing to the onset of the problem. Keep in mind that in such instances the patient mayor may not be correct; the particular disorder may have been developing over some period of time, perhaps as a result of a biomechanical abnormality, and may simply be aggravated by a particular activity. By evaluating the mechanical effects of activities that reproduce the pain, the examiner can often find important clues as to the nature of a particular disorder.
5.2.1.5 Shoes tend to provide support for the twisted or arched configuration of the foot to varying degrees. A high heel can, causes the toes to dorsiflex when standing with the feet in contact with the ground. This raises the arch by tightening the plantar aponeurosis that crosses the plantar surface of the metatarsophalangeal joints (Fig. 15-21). Heels also reduce the passive tension on the Achilles tendon and gastrocnemius-soleus group and, by effectively reducing the toe lever-arm of the foot, reduce the active tension developed in the gastrocnemius-soleus muscle-tendon complex. Most shoes also provide some contoured base of support for the arch of the foot. This maximizes the contacting surface area of the foot and, therefore, distributes the stresses of weight bearing over most of the sole of the foot. Proper contouring of a shoe also minimizes the amount of tension that needs to be developed in the plantar aponeurosis, long and short plantar ligaments tarsal joint capsules, and intrinsic muscles to maintain a normal twisted configuration of the foot.
5.2.1.6 When a person walks barefoot, the effects of the heel and contoured support are lost. This usually creates no problem in a person with good bony alignment and ligamentous support. However, in a person with a tendency toward pronation (untwisting of the foot) the added tension to the plantar ligaments may lead to pain. Or, if the ligaments are already lax, increased intrinsic muscle activity will be necessary. If such prolonged muscular activity is necessary, pain may also arise from muscular fatigue.
5.2.1.7 These persons are often more comfortable wearing shoes than going barefoot. Even persons with normal foot structure may experience some foot pain with lower heel heights if they are accustomed to wearing a shoe with a heel. Lowering the heel reduces the support provided by the plantar aponeurosis, putting more tension on the plantar ligaments and join! capsules and calling for increased activity of the intrinsic muscles of the foot. This is why flat-soled shoes, especially, must have well-contoured "arch supports."
5.2.1.8 Shoes also provide an interface for shear and compressive stresses. Foot pain arising from localized pressure concentration, from shear stresses between the skin and an exterior surface, or from shearing between skin and subcutaneous tissue may be alleviated by going barefoot. This is primarily true in cases in which such stresses occur over all but the soles of the feet.
5.2.1.9 Pain...from pressure concentration over the sole of the foot, as frequently occurs over the head of the second metatarsal, may be reduced by wearing shoes, since the contouring of the shoe may serve to distribute the pressures of weight-bearing over a broader area
5.2.1.10 Complaints of cramping of the foot may accompany muscular fatigue usually associated with some biomechanical disturbance. Cramping may also accompany intermittent Claudication from arterial insufficiency. Claudication should always be suspect when the patient relates a history of pain or cramping of the feet, and usually of the lower leg, after walking some distance, but the pain is relieved with rest. Cramping may accompany disk protrusions, presumably from altered conduction of fibers subserving motor control or muscle reflexes. This cramping is noticed more often at night.
5.3 Observation
5.3.1 Observation
5.3.1.1 General appearance and body build
5.3.1.1.1 Weight bearing stresses will be increased in the presence of obesity.
5.3.1.2 Activities of Daily Living
5.3.1.2.1 Dressing, grooming, gait, and transfer activities (see gait analysis discussion under Lumbar -lower extremity scan examination). With localized foot or ankle disorders, usually only the gait is affected. Observe the patient walking with and without shoes. An antalgic gait associated with foot or ankle lesions is typically one in which heel-strike or push-off, or both, are lacking. This results in a shortened stride on the affected side, which is accentuated at faster paces. Chronic disorders may produce no obvious gait disturbances. However, look carefully for subtler gait deviations, indicating a possible biomechanical abnormality of one or more of the weight-bearing joints that may be related to a foot problem. It is of primary importance to observe for abnormal rotatory movements of the weight-bearing segments; to assess rotations of the hindfoot into pronation and supination, look at the following:
5.3.1.2.1.1 The patellae
to judge rotary movements of the femur
5.3.1.2.1.2 The position of the malleoli with respect to each other or the tibia
5.3.1.2.1.3 The position of the calcanei
5.3.1.2.1.4 The degree of toeing in or toeing-out
5.3.1.2.1.5 The degree of motion in ankle dorsiflexion and plantar flexion
5.3.1.2.1.6 The angle and base of gait. Normally this angle does not exceed 15 degrees from the midline of the body
5.3.1.2.1.7 Point-of. heel contact. The position of the calcaneus in either eversion or inversion during heel-strike
5.3.1.2.1.8 The approximate time of pronation
5.4 Inspection
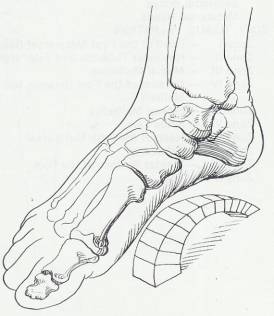
5.4.1 When the patient enters the examination room, inspect the external appearance of the shoe and foot. A deformed foot can deform any good shoe; in fact, in many cases, the shoe is a literal showcase for certain disorders. For example, the shoes of an individual with flat feet usually have broken medial counters due to the prominence of the talar head (Fig. 36); the shoes of an individual with a drop foot display scuffed toes from scraping the floor in swing phase (Fig. 16, Gait Chapter); and the shoes of patients who toe-in show excessive wear on the lateral border of the sole. Creases of the forepart of the shoe may also reflect foot pathology; creases that are markedly oblique, rather than transverse, indicate possible hallux rigidus, since toe-off then occurs on the lateral side of the foot (Fig. 78). The absence of creases indicates no toe-off. Of course, foot trouble may also stem from objects protruding inside the shoe, such as nails and rivets, or from rough stitching or a wrinkled shoe lining.
5.4.2 Since a comprehensive examination of the foot and ankle includes an inspection of the entire lower extremity as well as the lumbar spine, have the patient remove his clothing from the waist down. As he undresses, observe his foot and ankle as they bear weight, for it is in the weight-bearing position that most abnormal conditions manifest
5.4.3 To begin inspection count the toes to make certain that there are the customary five, for occasionally you may find a supernumary digit, a congenital anomaly. The toes should appear straight, flat, and in proportion to each other as well as to those of the other foot. A disproportionately large toe may be either swollen or a congenital anomaly. Overlapping toes may or may not be an adaptation to a bunion; they are not usually painful in themselves.
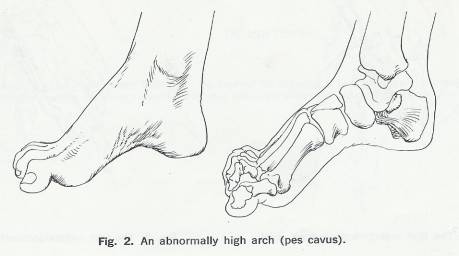
5.4.4 Ask the patient to be seated to determine whether his feet at rest assume the normal few degrees of plantar flexion and inversion rather than dorsi flexion and eversion (spastic flat feet). Then evaluate the general shape of the foot. Normally, the dorsum of the foot is domed due to the medial longitudinal arch (Fig. I), which extends between the first metatarsal head and the calcaneus. The arch is more prominent in the non-weight-bearing position; occasionally, it may be abnormally high (pes cavus) (Fig. 2) or absent (pes planus). Additionally, in children, you may find the forefoot inclined medially on the hindfoot (forefoot adductus) (Fig. 93), or the hindfoot in excessive valgus or varus (Fig. 37).
5.4.5 Note that the foot changes color in the weight-bearing and non-weight-bearing positions. Normally, it takes a few seconds for the color to change from a dark to a lighter pink when the foot becomes non-weight-bearing. If the foot is a light pink when elevated but becomes beet red when lowered (dependent rubor), there may be small-vessel vascular disease or arterial insufficiency.
5.4.6 The skin of the foot is extremely thick at the normal weight-bearing areas; The heel, the lateral border, and the first and fifth metatarsal heads. A pathologic increase in this skin thickness (callosity) is caused by these areas bearing abnormal amounts of weight. This condition most often manifests itself over the metatarsal heads (Fig. 29).
5.4.7 Figure 1
5.4.7.1
5.4.8 Figure 2
5.4.8.1
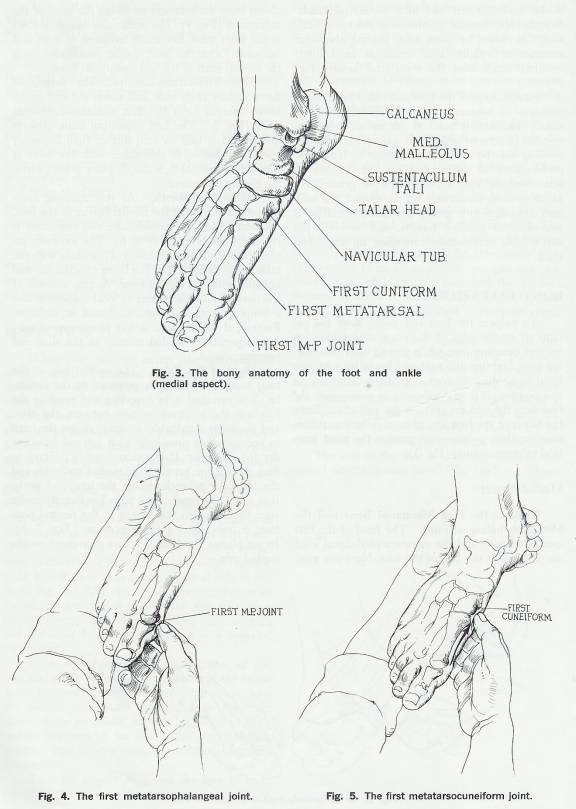
5.4.9 Figure 3, 4, & 5
5.4.9.1
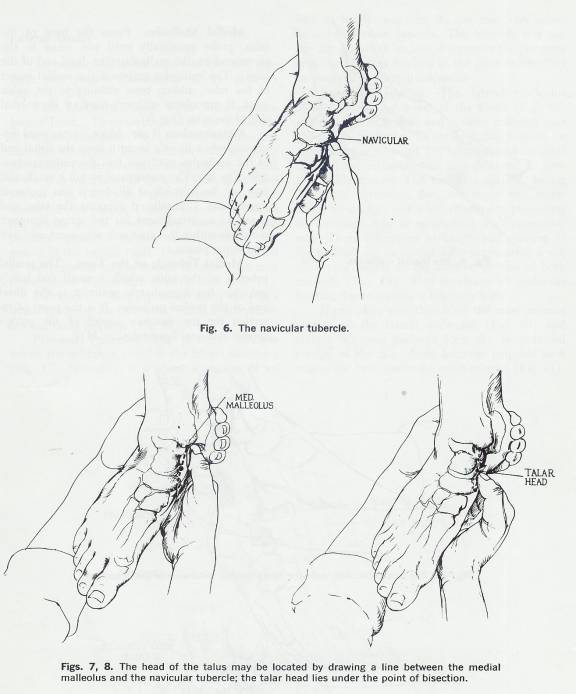
5.4.10 Figure 6, 7, & 8
5.4.10.1
5.4.11 Finally, inspect the foot and ankle for obvious unilateral or bilateral swelling. Unilateral swelling usually indicates a residual edema secondary to trauma (fractured ankle, for example); bilateral swelling may be evidence of cardiac or lymphatic problems, or of pelvic obstruction to venous return. Swelling may also be local or generalized. Local swelling commonly occurs around the malleoli secondary to a sprain; generalized swelling is secondary to massive trauma, and involves the entire foot, occasionally extending up the tibial shaft.
5.5 Bony Palpation
5.5.1 Introduction
5.5.1.1 To palpate the foot and ankle, have the patient sit on the edge of the examining table with his legs dangling free, while you sit on a stool facing him. Stabilize the foot and lower leg with one hand by holding the foot around the calcaneus. In this position, it is relatively easy to manipulate the foot into the various postures for palpation. Since the bones of the foot are, in most instances, subcutaneous, their prominences present the most practical reference points.
5.5.2 Medial Aspect
5.5.2.1 Head of the First Metatarsal Bone and the Metatarsophalangeal Joint
5.5.2.1.1 The head of the first metatarsal bone and the metatarsophalangeal joint are palpable at the ball of the foot. Note any associated bone excrescences involving the head of the metatarsal. The metatarsophalangeal joint is the joint most frequently involved in gout and bunions. From the joint, probe proximally along the medial shaft of the first metatarsal bone.
5.5.2.2 First Metatarsocuneiform
5.5.2.2.1 The metatarsal flares slightly at its base, and meets the first cuneiform bone to form the first metatarsocuneiform joint. The first cuneiform bone projects distally nearly half an inch further than the other cuneiform bones. It articulates with the base of the first metatarsal in a simple plane joint, providing gliding movement.
5.5.2.3 Navicular Tubercle
5.5.2.3.1 As you continue moving proximally along the medial border of the foot, the next large bony prominence you encounter is the navicular tubercle. The Navicular is located 5 cm directly anterior to the sustentaculum located as a prominence on the medial aspect of the arch of the foot. The tibionavicular portion of the deltoid ligament attaches just above the tubercle. The navicular articulates with five other bones. Proximally with the talar head, distally with the three cuneiforms, and laterally with the cuboid bone. Aseptic necrosis of the navicular, characterized by local tenderness and a limping gait, is sometimes found in children. Further, if the tubercle is too prominent, it may press against the medial counter of the shoe and become painful.
5.5.2.4 Head of the Talus
5.5.2.4.1 The medial side of the talar head is immediately proximal to the navicular. The medial aspect of the talar head can be palpated as a less prominent bony landmark just superior, and perhaps slightly posterior, to the navicular tubercle. These two landmarks (Talar Head & Navicular) are important in assessing the structure of the foot with regard to the degree of twisting of the forefoot in relation to the hindfoot (the degree of “arching” of the foot). You can find it by inverting and everting the forefoot; the resultant motion between the talus and navicular is palpable. Eversion causes the head to become more prominent as it juts out from under the navicular. If the talar head is difficult to find, draw a line between the medial malleolus and the navicular tubercle, bisect the line, and probe that area. The head of the talus lies directly under your fingers; when the foot is in the neutral position, it feels like a slight depression. In pes planus, the head becomes prominent on the medial side.
5.5.2.5 Medial Malleolus
5.5.2.5.1 From the head of the talus, probe proximally until you come to the prominent and easily palpated medial malleolus (the distal end of the tibia). The malleolus embraces the medial aspect of the talus, adding bone stability to the ankle joint. It articulates with one-third of the medial side of the talus.
5.5.2.6 Sustentaculum Tali
5.5.2.6.1 Move plantarward approximately a finger’s breadth (2 cm) from the distal end of the malleolus until you find the sustentaculum tali. The sustentaculum tali is small, and may not be palpable at all, but it has anatomic significance. Palpation is made easier if the foot is held in an everted position. Clinically, it supports the talus and serves as an attachment for the spring ligament (Calcaneocuboid); problems within this anatomic alignment may well lead to pes planus. The tibiocalcaneal portion of the deltoid ligament passes from the malleolus to the sustentaculum tali.
5.5.2.7 Medial Tubercle of the Talus
5.5.2.7.1 The medial tubercle of the talus, which is small and barely palpable, lies immediately posterior to the distal end of the medial malleolus. It is the point of insertion for the posterior aspect of the ankle’s medial collateral ligament.
5.5.2.8 Figure 9
5.5.2.8.1 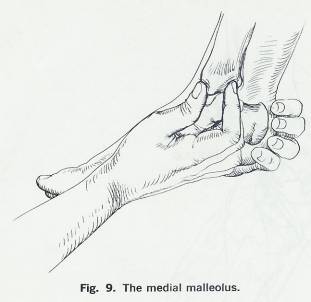
5.5.2.9 Figures 10 &11
5.5.2.9.1 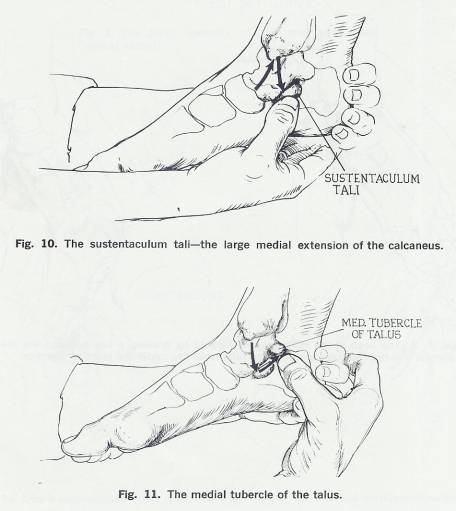
5.5.3 Dorsal Aspect
5.5.3.1 At the level of the malleoli, the anterior aspects of the distal ends of the tibia and fibula can be felt. The junction of the two bones, at the syndesmosis, can usually be distinguished, although it is considerable obscured by the distal tibiofibular ligament that overlies it. With the foot relaxed in some degree of plantar flexion, the dorsal aspect of the talar neck can b e felt just distal to the end of the tibia. With the foot held inverted and plantarly flexed, the anterolateral aspect of the articular surface of the talus can be easily felt just distal and somewhat lateral to the syndesmosis. Between the dorsal aspect of the talar neck and the most prominent aspect of the dorsum of the foot farther distally, which is the first cuneiform, is the navicular bone, the dorsal aspect of which can be palpated.
5.5.4 Lateral Aspect
5.5.4.1 To palpate the lateral aspect of the foot, continue your present stabilization of the patient’s foot.
5.5.4.2 Fifth Metatarsal Bone; Fifth Metatarsophalangeal Joint
5.5.4.2.1 These are situated at the lateral side of the ball of the foot. Note that the first and fifth metatarsal heads are normally the most prominent. Probe proximally along the lateral shaft of the fifth metatarsal to its flared base, the styloid process. Notice that the Peroneus brevis inserts into the process. Directly behind the flare of the process and in front of the cuboid lies a depression, which is further accentuated by the groove in the cuboid itself. The Peroneus longus muscle tendon creates this groove as it runs to the medial plantar surface of the foot.
5.5.4.3 Calcaneus
5.5.4.3.1 Move proximally along the foot’s lateral border to the calcaneus, which is subcutaneous, fairly flat laterally and easily palpable.
5.5.4.4 Peroneal Tubercle
5.5.4.4.1 About 3 cm distal to the tip of the malleolus, a small prominence can be felt, and is named the peroneal tubercle. The peroneal tubercle lies on the calcaneus, distal to the lateral malleolus. Normally, it is about a quarter of an inch in length; however, its size may vary somewhat in different patients. The tubercle is a significant landmark because it separates the Peroneus brevis and longus tendons at the point where they pass around the lateral calcaneus. The peroneus brevis tendon passes superior to the tubercle, whereas the peroneus longus passes inferiorly. Occasionally a small prominence can be palpated just posterior to the peroneal tubercle; this is the point of insertion of the calcaneofibular ligament.
5.5.4.5 Lateral Malleolus
5.5.4.5.1 The lateral malleolus lies subcutaneously and so is easily palpated. The lateral malleolus, located at the distal end of the fibula extends further distally and is more posterior than the medial malleolus. Its configuration permits the ankle mortise to point 15° laterally, and its additional distal extension acts as a deterrent to eversion ankle sprains. The medial malleolus, have less distal extension, does not enjoy this mechanical advantage, and is less effective in preventing the inversion type of sprain that is so commonly seen. These differences in length and position of the malleoli can be more readily appreciated if you place your fingers on the anterior portion of both malleoli. The incidence of Malleolar fracture due to trauma is relatively high.
5.5.4.5.2 If you place your thumb on the most anterior portion of the lateral malleolus and plantar flex your patient’s foot, the Anterolateral portion of the talar dome becomes palpable as it rotates out from under the ankle mortise.
5.5.4.6 Figure 12
5.5.4.6.1 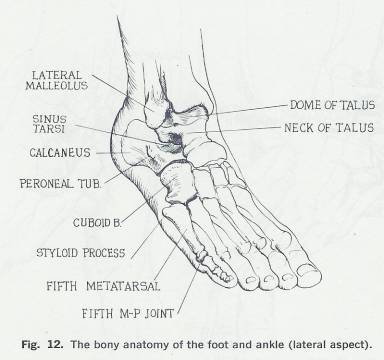
5.5.4.7 Figures 13, 14, 15, & 16
5.5.4.7.1 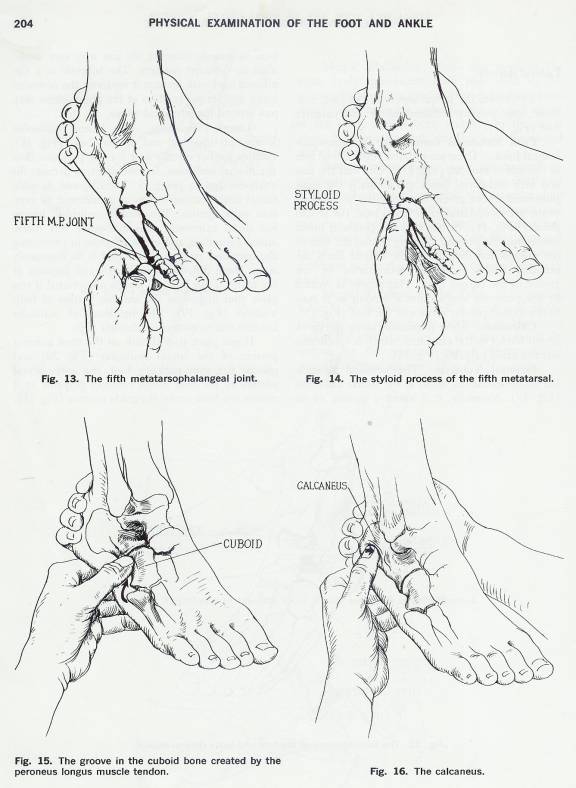
5.5.4.8 Figures 17, 18, & 19
5.5.4.8.1 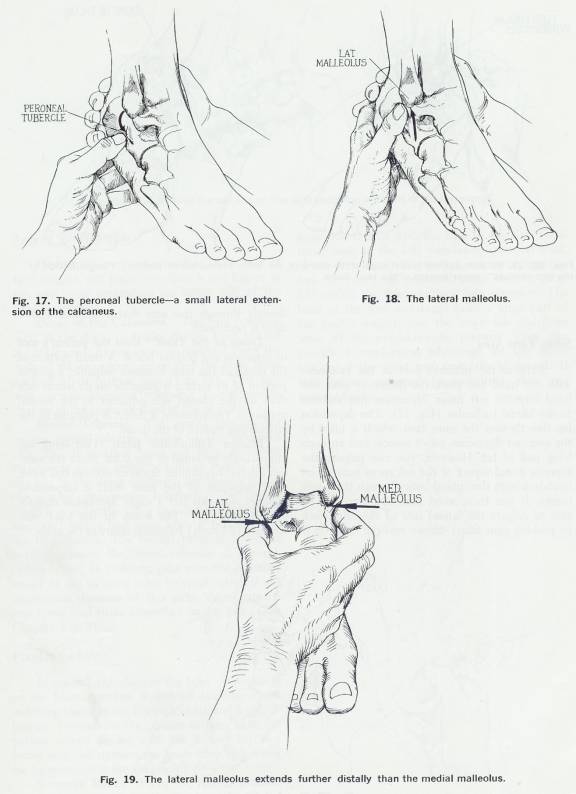
5.5.4.9 Figures 20 & 21
5.5.4.9.1 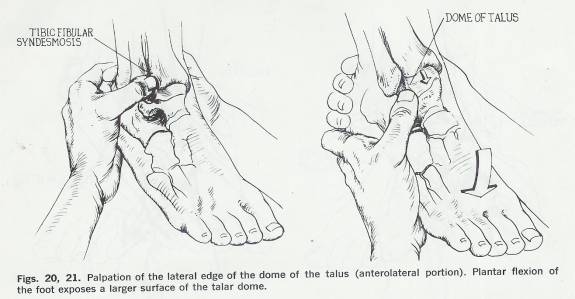
5.5.4.10 Sinus Tarsi Area
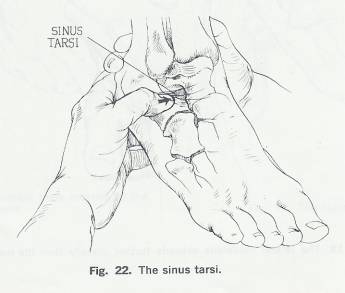
5.5.4.10.1 Stabilize the patient's foot at the calcaneus with one hand and place the thumb of your free hand into the soft tissue depression just distal and slightly anterior to the lateral malleolus (Fig. 22). The depression lies directly over the sinus tarsi, which is filled by the extensor digitorum brevis muscle and an overlying pad of fat. This is the lateral opening of the sinus tarsi. Traversing the lateral aspect of the sinus tarsi are the inferior bands of the extensor retinaculum and the cervical talocalcaneal ligament. However, you can palpate the superior dorsal aspect of the calcaneus near its articulation with the cuboid bone through these soft tissues. If you then invert the foot; you may be able to palpate the lateral side of the talar neck by pushing your finger deeper into the sinus. It is directly through this area that a subtalar Arthrodesis is performed.
5.5.4.11 Dome of the Talus
5.5.4.11.1 Keep the patient’s foot in inversion and plantar flex it. A small portion of the dome of the talus becomes palpable; a greater portion of its surface is palpable on its lateral side than on the medial side adjacent to the medial malleolus. Occasionally, a defect is palpable in the articulating surface of the dome.
5.5.4.12 Inferior Tibiofibular Joint
5.5.4.12.1 This joint lies immediately proximal to the talus. Since the anterior inferior tibiofibular ligament overlies this joint, clear palpation of the joint itself is impossible; however, you can feel a slight depression directly over it. (Fig. 20) The bones of the joint may separate (diastasis) following injury to the ankle.
5.5.4.13 Figure 22
5.5.4.13.1
5.5.4.14 Figure 23
5.5.4.14.1
5.5.4.15 Figure 24
5.5.4.15.1
5.5.5 Area of the Hindfoot
5.5.5.1 Introduction
5.5.5.1.1 Have the patient relax their foot, take hold of the Hindfoot, and place your thumb and fingers in the soft tissue depressions on either side of the Achilles tendon.
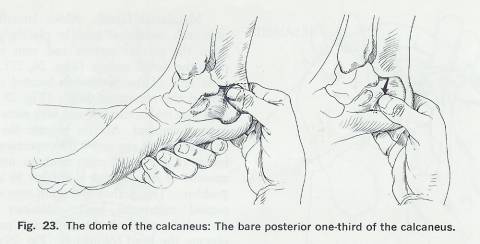
5.5.5.2 Dome of the Calcaneus
5.5.5.2.1 The bare posterior third of the dome protrudes sharply from behind the ankle joint. As you move plantarward along the walls of the calcaneus, notice that the bone flares outward at its plantar base (Fig. 23). This flair may become excessive following a compression fracture of the posterior third of the os Calcis.
5.5.5.2.2 At the posterior aspect of the heel is prominent crest running horizontally between the upper and lower posterior Calcaneal surfaces.
5.5.5.2.3 The Achilles tendon gains attachment to the upper surface.
5.5.5.2.4 Palpation of the posterior aspect of the talus is obscured by the Achilles tendon, which overlies it prior to inserti9ng on the calcaneus.
5.5.5.3 Medial Tubercle of Calcaneus
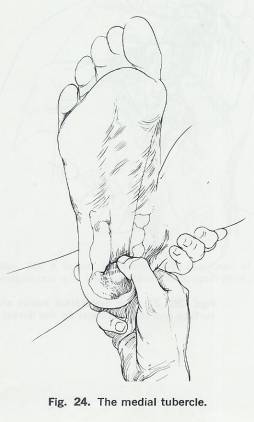
5.5.5.3.1 The lower surface of the calcaneus is covered by a fat pad, slopes forward to the medial and lateral tubercles on the inferior aspect of the calcaneus.
5.5.5.3.2 Palpation of the inferior aspect of the calcaneus is made difficult by the thick skin and fat pad that cover it.
5.5.5.3.3 The weight-bearing medial tubercle can be vaguely distinguished posteriorly in most persons.
5.5.5.3.4 Traction osteophytes (heel spurs) occasionally develop just anterior to the Calcaneal tubercles where the long plantar ligament attaches.
5.5.5.3.5 The medial tubercle lies on the medial plantar surface of the calcaneus (Fig. 24). It is rather broad and large, and gives attachment to the abductor hallucis muscle medially and to the flexor digitorum brevis muscle and the plantar aponeurosis anteriorly.
5.5.5.3.6 The medial tubercle is not really sharp and distinct unless it is associated with a heel spur, when it becomes tender to palpation.
5.5.5.3.7 The medial tubercle is weight bearing, whereas the lateral tubercle of the calcaneus is not.
5.5.5.3.8 In children, pain over the posterior aspect of the os Calcis (due to epiphysitis) is not uncommon. Because of this pain, these patients may avoid heel strike altogether during gait. (Gait Chapter, Fig. 8)
5.5.6 Plantar Surface
5.5.6.1 In general, palpation of the bone prominences on the plantar surface is difficult because of the overlying fascial bands, the pads of fat, and large callosities. To examine the plantar surface, have the patient extend his leg with the sole of his foot facing you, and stabilize the lower limb by holding his leg posterior to the ankle joint.
5.5.6.2 Sesamoid Bones
5.5.6.2.1 From the medial tubercle of the calcaneus, palpate distally along the medial longitudinal arch past the base of the first metatarsal bone to the first metatarsophalangeal joint. If you press firmly on the first metatarsal, you can feel the two small sesamoid bones that lie (Fig. 25) within the flexor hallucis brevis tendon. The head of the first metatarsal bears a large part of the body's weight, and the sesamoids distribute some of the weight-bearing pressure. They also provide a mechanical advantage for the flexor tendon of the great toe, especially at toe-off. If they become inflamed (sesamoiditis), they may become tender.
5.5.6.3 Figure 25
5.5.6.3.1 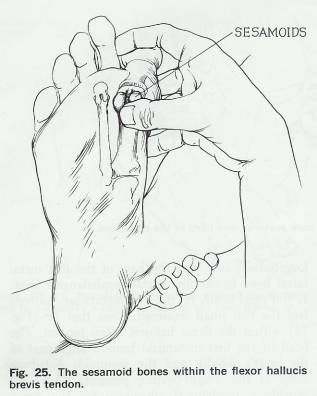
5.5.6.4 Figure 26 & 27
5.5.6.4.1 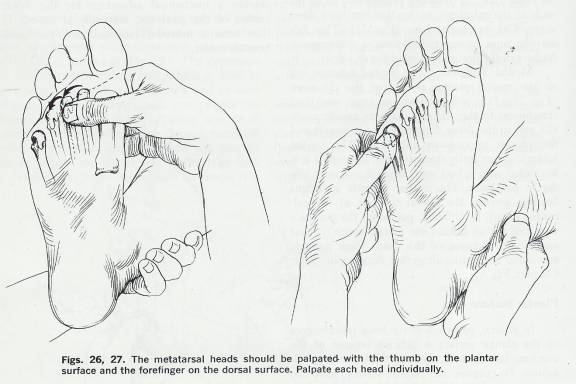
5.5.6.5 Metatarsal Heads
5.5.6.5.1 Move laterally and palpate each metatarsal head by placing your thumb upon the plantar surface and your index finger upon the dorsal surface (Figs. 26, 27). The transverse arch of the forefoot is located immediately behind the metatarsal heads (Fig. 28); it is this arch that makes the first and fifth metatarsal heads most prominent.
5.5.6.5.2 As you palpate the heads, try to determine if any one is disproportionately prominent. If one is, it must bear an unaccustomed amount of weight and is subject to a variety of problems.
5.5.6.5.3 This pathology occurs most often to the second metatarsal head; Callosities that have formed because of the increased pressure may obscure the head completely (Fig. 29).
5.5.6.5.4 Occasionally, the fifth metatarsal head exhibits excessive callosity.
5.5.6.5.5 Pain in the second, third, or fourth metatarsal heads may be secondary to aseptic necrosis (lack of blood supply), which, in turn, creates an antalgic gait.
5.5.6.6 Figure 28 & 29
5.5.6.6.1 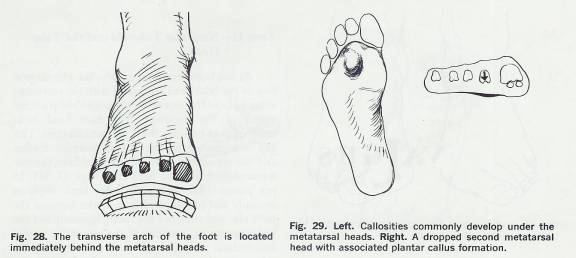
5.5.6.7 Figure 30
5.5.6.7.1 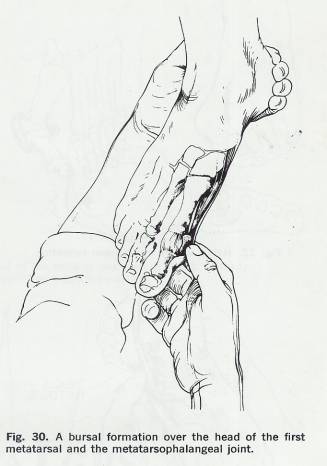
5.6 Soft tissue Palpation
5.6.1 Zone 1
5.6.1.1 Head of the First Metatarsal Bone
5.6.1.1.1 The area surrounding the prominent head of the first metatarsal bone and the first metatarsophalangeal joint is the site of that common pathologic condition, Hallux valgus (Fig. 30).
5.6.1.1.2 Hallux valgus is a deformity characterized by lateral deviation of the great toe. In many cases, the deviation is so excessive that it causes the big toe to overlap the second toe (Fig. 31). The first metatarsal shaft may be medially angulated (metatarsus primus varus) as well. Under such circumstances, an excrescence of bone may grow over the medial aspect of the first metatarsal head and cause the surrounding soft tissue to swell. The resultant increased pressure and friction against the shoe can cause the development of a bursa, which frequently becomes tender and inflamed. Characteristically, the surrounding area appears reddened (bunion formation) (Fig. 32).
5.6.1.1.3 The medial aspect of the first metatarsal head is also a common site for gout. Tophi (deposits of urate crystals in the tissues about the joints) often develop at the first metatarsophalangeal joint and cause pain as well as deformity. Take care not to confuse such tophi deposits with the bunion formation associated with Hallux valgus.
5.6.2 Zone 2
5.6.2.1 Navicular Tubercle and the Talar Head
5.6.2.1.1 The plantar portion of the talar head articulates with the sustentaculum tali and the anterior portion with the posterior aspect of the navicular. The talar head lacks bony support between these two articulations. The tibialis posterior tendon and the spring ligament, which runs from the sustentaculum tali to the navicular, support this gap. In pes planus (flat feet), the talar head displaces medially and plantarward from under cover of the navicular and stretches the spring ligament and the tibialis posterior, resulting in the loss of the medial longitudinal arch. A callosity may develop over the now prominent talar head at the point where the skin presses against the shoe’s medial counter. Because of the callosity, the stretched soft tissue structures, and the valgus angle of the os Calcis (when viewed from the posterior aspect of the foot), the area may be exceedingly tender to palpation.
5.6.2.2 Figures 31 & 32
5.6.2.2.1 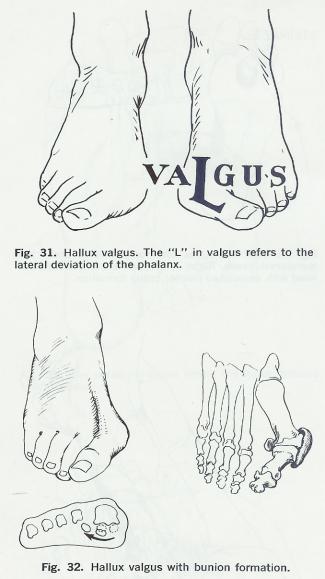
5.6.2.3 Figures 33 & 34
5.6.2.3.1 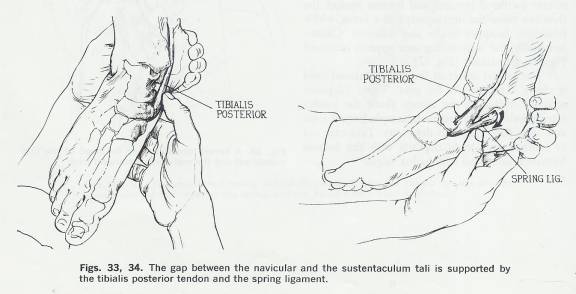
5.6.2.4 Figures 35, 36, & 37
5.6.2.4.1 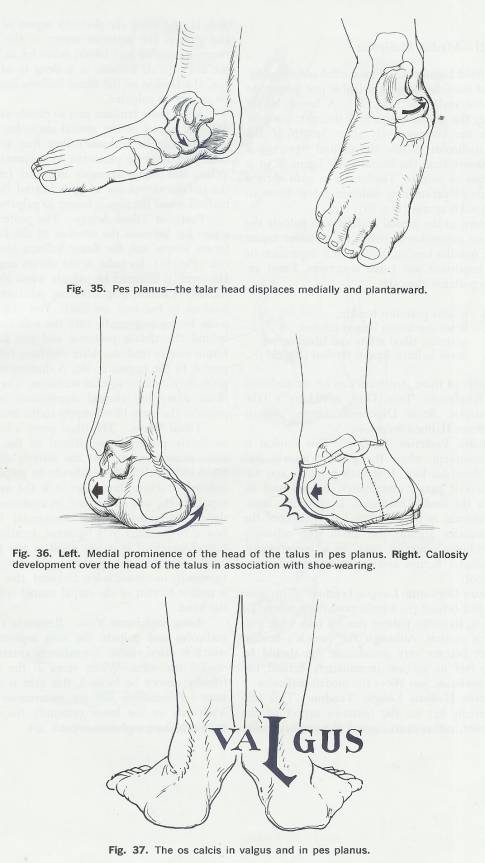
5.6.3 Zone 3 Medial Malleolus
5.6.3.1 Deltoid Ligament
5.6.3.1.1 Deltoid Ligament. The medial collateral ligament of the ankle joint is palpable just inferior to the medial malleolus (Fig. 38). A broad, strong ligament, the deltoid's size and strength compensate for the comparatively short length of the medial malleolus. While the de1toid ligament is more massive than the lateral ankle ligament, it is not as easy to palpate. Tenderness or pain elicited during its palpation may indicate a tear from an eversion ankle sprain (Fig. 39).
5.6.3.1.2 Return to the medial malleolus to palpate the soft tissue depression between its posterior aspect and the Achilles tendon. Within this depression lie several important soft tissue structures. From anterior to posterior they are:
5.6.3.1.2.1 Tibialis posterior tendon
5.6.3.1.2.2 Flexor digitorum longus tendon;
5.6.3.1.2.3 Posterior tibial artery and tibial nerve;
5.6.3.1.2.4 Flexor hallucis longus tendon (Fig. 38)
5.6.3.1.3 The order of the structures in this area can be remembered by the mnemonic “Tom, Dick, an’ Harry”: Tibialis Posterior, flexor Digitorum longus, Artery (tibial artery), Nerve (tibial nerve), flexor Hallucis longus.
5.6.3.2 Tibialis Posterior Tendon
5.6.3.2.1 The tibialis posterior is the most anterior tendon and is most prominent and more easily palpated when the patient inverts and plantar flexes his foot against some resistance. It is both palpable and visible where it passes immediately behind and inferior to the medial malleolus. If spasticity, meningomyelocele, or poliomyelitis have weakened the other muscles around the ankle, the relatively strong tibialis posterior may, as a consequence, cause plantar flexion and an inversion deformity of the foot.
5.6.3.3 Flexor Digitorum Longus Tendon
5.6.3.3.1 This muscle lies just behind the tibialis posterior tendon and is less prominent. To palpate it, have the patient flex his toes while you resist his motion. Although the muscle’s tendon does not become very prominent, you should be able to feel its motion immediately behind the tibialis posterior, just above the medial malleolus.
5.6.3.4 Flexor Hallucis Longus Tendon
5.6.3.4.1 This tendon actually lies on the posterior aspect of the ankle joint, rather than around the medial malleolus. It runs along the posterior aspect of the tibia and grooves the posterior aspect of the talus between its medial and lateral tubercles as it crosses the ankle joint. Because it is deep to other muscles, the tendon of the flexor hallucis longus muscle cannot be palpated.
5.6.3.4.2 All of these tendons pass so closely around the posterior aspect of the medial malleolus (particularly the tibialis posterior) that they groove the bone and must be protected by a synovial lining. When this lining becomes inflamed (Synovitis), the patient complains of pain behind the medial malleolus and the area is tender to palpation.
5.6.3.5 Posterior Tibial Artery
5.6.3.5.1 The posterior tibial artery lies between the tendons of the flexor digitorum longus and the flexor hallucis longus muscles behind the malleolus. (Figure 40)
5.6.3.5.2 Its pulse is not always easy to find. It is easier to palpate when the foot is relaxed in a non-weight-bearing position and the tendons in the area are slack.
5.6.3.5.3 The pulse can be felt by pressing gently into the soft tissue space behind the Tibialis posterior and the flexor digitorum longus tendons.
5.6.3.5.4 After you have felt it, compare it to the opposite side.
5.6.3.5.5 A diminution of this pulse may indicate arterial occlusion.
5.6.3.5.6 The posterior tibial artery has clinical significance because it provides the main blood supply to the foot.
5.6.3.6 Tibial Nerve
5.6.3.6.1 The tibial nerve is located immediately posterior and lateral to the posterior tibial artery, and follows the artery’s course into the foot.
5.6.3.6.2 The nerve is difficult to palpate as an isolated structure, but, since it is the main nerve supply to the sole of the foot, its anatomic position should be noted.
5.6.3.6.3 The neurovascular bundle is bound to the tibia by a ligament, creating a tarsal tunnel, which, if it is too small or too tight, can cause Neurovascular problems in the foot.
5.6.3.6.4 Although its incidence is less frequent, this syndrome is similar to that of the carpal tunnel syndrome in the hand.
5.6.3.7 Long Saphenous Vein
5.6.3.7.1 Locate the medial Malleolus and palpate the long Saphenous vein, which is often visible immediately anterior to the medial Malleolus.
5.6.3.7.2 When veins in the upper extremity cannot be located, this vein is usually an accessible site for intravenous infusion.
5.6.3.7.3 Varicosity in the lower extremity frequently involves the long Saphenous vein.
5.6.3.8 Long Saphenous Nerve
5.6.3.8.1 Just anterior to the medial malleolus is the long saphenous nerve; it can usually be visualized and palpated.
5.6.3.8.2 Figures 38, 39, & 40
5.6.3.8.2.1 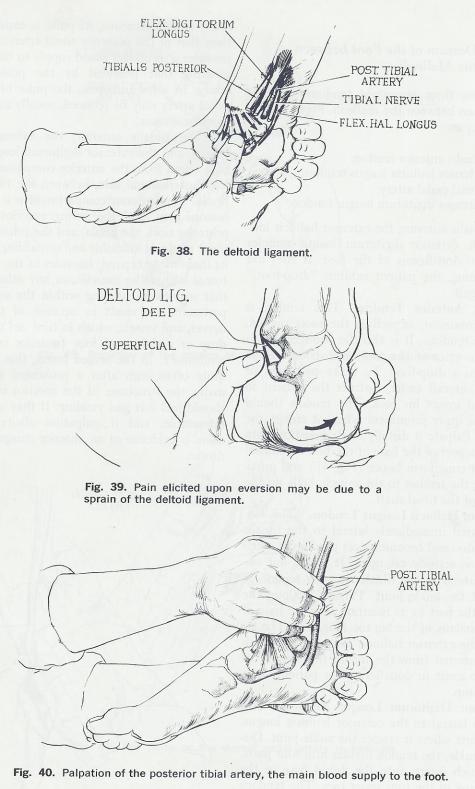
5.6.4 Zone 4 Dorsum of the Foot between the Malleoli
5.6.4.1 There are three important tendons and one vessel that pass between the malleoli. From medial to lateral they are:
5.6.4.1.1 Tibialis anterior tendon
5.6.4.1.2 Extensor hallucis longus tendon
5.6.4.1.3 Dorsal pedal artery;
5.6.4.1.4 Extensor digitorum longus tendon
5.6.4.1.5 Peroneus Tertius
5.6.4.2 The tibialis anterior, the extensor hallucis longus, and the extensor digitorum longus muscles are the main Dorsiflexors of the foot. If they are not functioning, the patient exhibits "drop-foot," or steppage gait.
5.6.4.3 Tibialis Anterior Tendon
5.6.4.3.1 This tendon is the most prominent, as well as the most medial, of the three tendons. It is also the strongest dorsiflexor and inverter of the foot, and its loss alone can result in a drop-foot. To make palpation of the tibialis anterior easier, instruct the patient to dorsiflex and invert his foot. The tendon should then become quite prominent where it crosses the ankle joint. Palpate it distally to its insertion onto the medial aspect of the base of the first metatarsal and the first cuneiform bones (Fig. 41) and proximally along the tendon to the muscle belly on the lateral side of the tibial shaft.
5.6.4.4 Extensor Hallucis Longus Tendon
5.6.4.4.1 This tendon is situated immediately lateral to the tibialis anterior tendon and becomes most prominent when the big toe is actively extended. It stands out immediately lateral to the tibialis anterior tendon at the level of the ankle joint: Palpate it along the dorsum of the foot to its insertion into the base of the distal phalanx of the big toe (Fig. 42). The insertion of the extensor hallucis longus may be surgically transferred from the toe to the dorsum of the foot, to assist in dorsiflexion for patients who have foot drop.
5.6.4.5 Extensor Digitorum Longus Tendon
5.6.4.5.1 This tendon lies lateral to the extensor hallucis longus. Palpate it first where it crosses the ankle joint. Distal to the ankle, the tendon divides into four parts, each of which inserts into the dorsal base of the distal phalanx of the four lesser toes. The tendons become prominent for palpation when the toes are extended.
5.6.4.6 Dorsal Pedal Artery (Pedal Pulse)
5.6.4.6.1 The dorsal pedal artery lies between the extensor hallucis longus and the extensor digitorum longus tendons on the dorsum of the foot. It is absent approximately 12 to 15 percent of the time (Fig. 43). Since the pedal artery is subcutaneous, its pulse is easier to detect than that of the posterior tibial artery. This artery provides a secondary blood supply to the foot, augmenting that provided by the posterior tibial artery. In some instances, the pulse of the dorsal pedal artery may be reduced, usually as a result of vascular disease.
5.6.4.6.2 Its pulse can best be palpated over the dorsum of the foot, at about the level of the Navicular and first cuneiform bones.
5.6.4.6.3 If the pedal pulses are easily felt, it is fairly certain that the blood supply to the leg is good. When these pulses are absent, the nutritional state of the leg is in question. Checking the pedal pulses is routine after leg or groin surgery and for those known to have impaired circulation to the legs.
5.6.4.6.4 The tibialis anterior, the extensor hallucis longus, and the extensor digitorum longus muscles take origin from the anterior compartment on the leg's anterolateral side, between the tibia and the fibula. This anterior compartment is a tight, fibroosseous area, and the strong anterior fascia, the posterior tibia, the fibula, and the interosseous ligament render it inflexible and unyielding. Because of its inability to expand, fractures of the tibia, hematomas within the muscles, or any other pathology that may cause swelling within the anterior compartment can result in necrosis of the muscles, nerves, and vessels, which in turn can create a foot drop or a deformed foot (anterior compartment syndrome). In the armed forces, this syndrome is quite often seen after a prolonged march. Normally, the structures of the anterior compartment should feel soft and yielding. If they are tight and intractable, and if palpation elicits tenderness, there is evidence of an anterior compartment syndrome.
5.6.4.7 Peroneus Tertius
5.6.4.7.1 If the subject everts and dorsiflexes the foot, the tendon of the peroneus Tertius is usually observable just proximal to its insertion at the dorsum of the base of the fifth metatarsal.
5.6.4.8 Figure 41
5.6.4.8.1 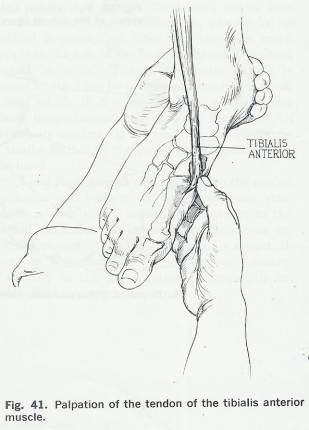
5.6.4.9 Figures 42 & 43
5.6.4.9.1 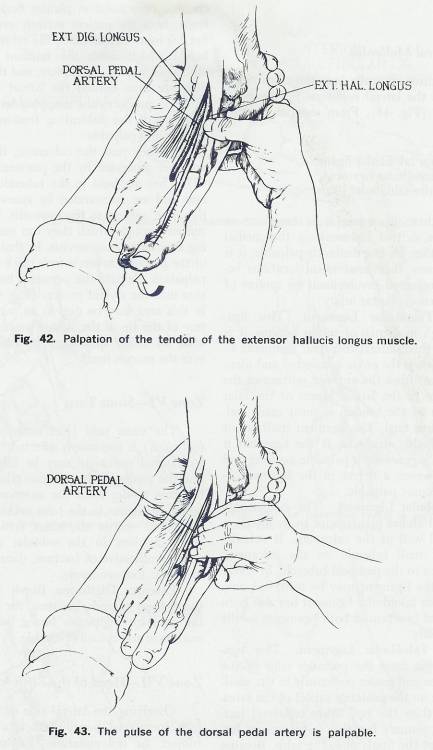
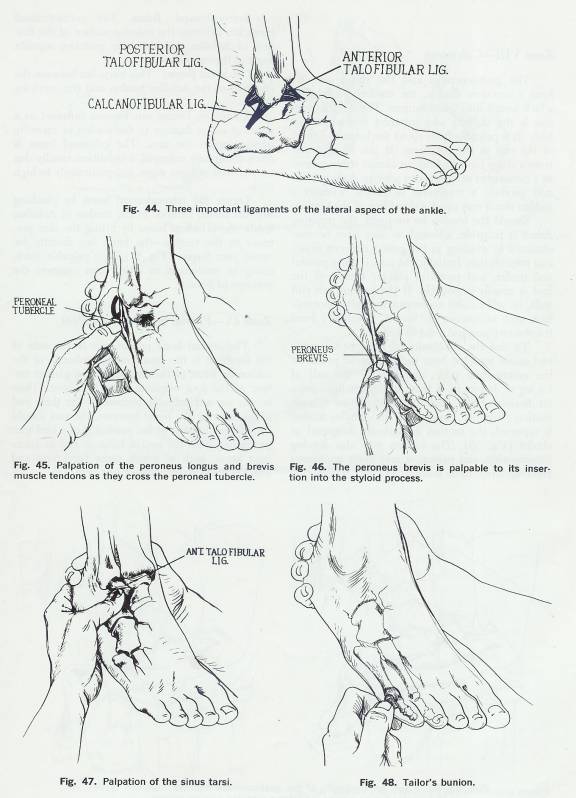
5.6.5 Zone 5 Lateral Malleolus
5.6.5.1 There are three clinically important ligaments, which comprise the lateral collateral ligaments of the ankle joint (Fig. 44). From anterior to posterior, they are:
5.6.5.1.1 Anterior talofibular ligament
5.6.5.1.2 Calcaneofibular ligament
5.6.5.1.3 Posterior talofibular ligament
5.6.5.2 None of these ligaments is as broad or as strong as is the deltoid ligament on the medial side. Although they are not distinctly palpable, it is important to know their anatomical locations because of their repeated involvement in sprains of the ankle (inversion plantar injury).
5.6.5.3 Anterior Talofibular Ligament
5.6.5.3.1 If the palpating finger is moved around dorsally and slightly superiorly from the sinus tarsi, the lateral aspect of the neck of the talus where the often injured anterior talofibular ligament attaches can be felt. This ligament has a high incidence of sprain because it is the first of the three lateral collateral ligaments to undergo stress when the ankle is inverted and plantar flexed. It runs from the anterior portion of the lateral malleolus to the lateral aspect of the talar neck. The area of the tendon is most easily palpated in the sinus tarsi. The ligament itself is not a distinctly palpable structure. If the ligament is sprained, there is generally a palpable swelling and tenderness. However, a defect in the ligament itself does not become palpable.
5.6.5.4 Calcaneofibular Ligament
5.6.5.4.1 The calcaneofibular ligament stretches plantarward to its insertion into the lateral wall of the calcaneus. It actually attaches to a small tubercle on the calcaneus, slightly posterior to the peroneal tubercle. In severe ankle sprains, the ligament may be torn, but only after the anterior talofibular ligament has also been torn. The loss of function of both ligaments results in ankle instability.
5.6.5.5 Posterior Talofibular Ligament
5.6.5.5.1 This ligament takes origin from the posterior edge of the lateral malleolus and passes posteriorly to the small lateral tubercle on the posterior aspect of the talus. It is stronger than the two other collateral ligaments, and its. primary function is to prevent forward slippage of the fibula onto the talus. Because of its strength and location, it is involved in only the most severe injuries to the ankle (dislocations).
5.6.5.6 Peroneus Longus and Brevis Tendons
5.6.5.6.1 These tendons pass immediately behind the lateral malleolus as they cross the ankle joint. (Fig. 45) The brevis is closer to the malleolus, grooving the bone as it passes, while the longus lies just posterior to the brevis. The Peronei are the primary foot everters, and they assist in plantar flexion. To palpate them, have the patient actively evert and plantar flex his foot. Occasionally, the retinaculum (facial band), which holds the tendons to the lateral malleolus, may be incomplete, and the tendons may dislocate from behind the lateral malleolus. This situation produces the snapping tendon syndrome; the snap of the dislocating tendons may be both audible and palpable.
5.6.5.6.2 As they pass the calcaneus, the Peronei tendons are separated by the peroneal tubercle. The brevis passes superior to the peroneal tubercle on the lateral aspect of the calcaneus; the longus passes inferior to the tubercle. (Fig. 45) They are held to the tubercle by a retinaculum and are surrounded by synovium. They are, therefore, subject to Tenosynovitis. In addition, the tunnel through which they run may narrow, causing stenosing Tenosynovitis. In that event, the area of the peroneal tubercle fells thick and is tender to palpation. Palpate the Peroneus brevis to its insertion into the styloid process. (Fig. 46) Tenderness in this area may be due to an avulsion or a fracture of the tip of the styloid process in association with an ankle sprain, or to an inflamed bursa over the process itself. Some resistance should be applied to the plantar flexion and eversion of the foot when palpating these tendons.
5.6.6 Zone 6
5.6.6.1 Sinus Tarsi
5.6.6.1.1 The sinus tarsi (just anterior to the lateral malleolus) is commonly affected by ankle sprains. Its normal concavity may be filled with edema, and the course of the anterior talofibular ligament becomes tender from the anterior portion of the lateral malleolus to the talar neck (Fig. 47). Deep tenderness within the sinus tarsi is evidence of some problem in the subtalar complex and is usually indicative of fracture, rheumatoid arthritis, or spastic foot syndrome.
5.6.6.1.2 Extensor Digitorum Brevis Muscle
5.6.6.1.2.1 When the patient extends his toes, the muscle belly of the extensor digitorum brevis bulges out of the sinus tarsi and is easily palpable.
5.6.7 Zone 7
5.6.7.1 Head of Fifth Metatarsal
5.6.7.1.1 Overlying the lateral side of the head of the fifth metatarsal bone, there is a bursa, which is subject to inflammation. Excessive friction or pressure upon this bursa can cause both bursitis and the development of an associated excrescence of bone over its lateral aspect with subsequent redness, swelling, and tenderness. This condition is know as “tailor’s bunion.” (Traditionally, tailors crossed their legs and held their feet in such a way that the lateral aspect of the fifth metatarsal head rested against the floor) (Fig. 48).
5.6.8 Figures 44,45, 46 47, & 48
5.6.8.1
5.6.9 Zone 8 Calcaneus
5.6.9.1 Achilles Tendon
5.6.9.1.1 The Achilles tendon is quite prominent and is easily seen and felt proximal to its insertion on the calcaneus. The gastrocnemius and the soleus muscles form a common tendon, the tendon of Achilles, which inserts into the calcaneus. The Achilles tendon is the thickest and strongest tendon in the body. It is palpable from about the lower one-third of the calf to the calcaneus. It can be ruptured from a sharp blow or from an abrupt strain caused by a moment of sudden excess activity. A sharp blow may produce a transverse laceration, whereas a sudden strain may cause a shredding of the tendon.
5.6.9.1.2 Should the tendon be ruptured, the resulting defect is palpable, although swelling in the period between injury and presentation may have obscured it. Initially, the area is quite painful and tender, and powerful plantar flexion of the foot is usually impossible. If the patient can still walk, he will exhibit accompanying gait abnormalities, such as absence of “toe-off” (push –off) from the stance phase and a flat-footed gait.
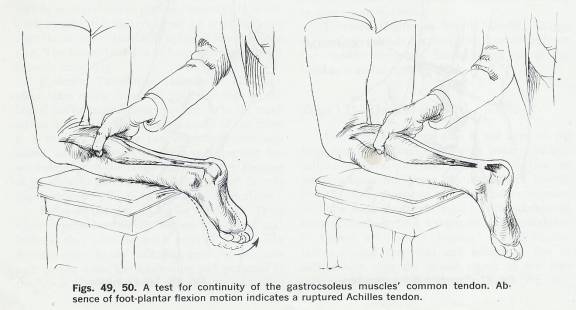
5.6.9.1.3 To test the continuity of the gastrocnemius and soleus muscles, have the patient lie prone on the examination table, and squeeze the calf of his leg to determine if there is any resultant plantar flexion of the foot. Normally, there is such motion. (Fig. 49) However, if the Achilles tendon is ruptured, the motion is markedly decreased or absent. . (Fig. 50) The tendon may also develop Tenosynovitis, and palpation may elicit tenderness and Crepitation upon motion.
5.6.9.2 Calcaneal Tendon Bursa
5.6.9.2.1 Introduction
5.6.9.2.1.1 These two bursae can become inflamed because of either damage to the tendon or excessive pressure upon the area.
5.6.9.2.1.2 Any palpable thickening or tenderness in either area suggests the presence of bursitis.
5.6.9.2.1.3 Unless inflamed these bursae cannot be distinguished on palpation.
5.6.9.2.2 Retrocalcaneal Bursa
5.6.9.2.2.1 The retro Calcaneal bursa lies between the anterior surface of the tendon of Achilles and the bare posterior superior angle of the calcaneus.
5.6.9.2.2.2 Locate this bursa by pinching the soft tissue, anterior to the tendon of Achilles.
5.6.9.2.3 Calcaneal Bursa
5.6.9.2.3.1 This bursa lies between the insertion of the Achilles tendon and the overlying skin.
5.6.9.2.3.2 The calcaneal bursa is more commonly enlarged a condition usually due to oversized or tight shoes and particularly to high heels.
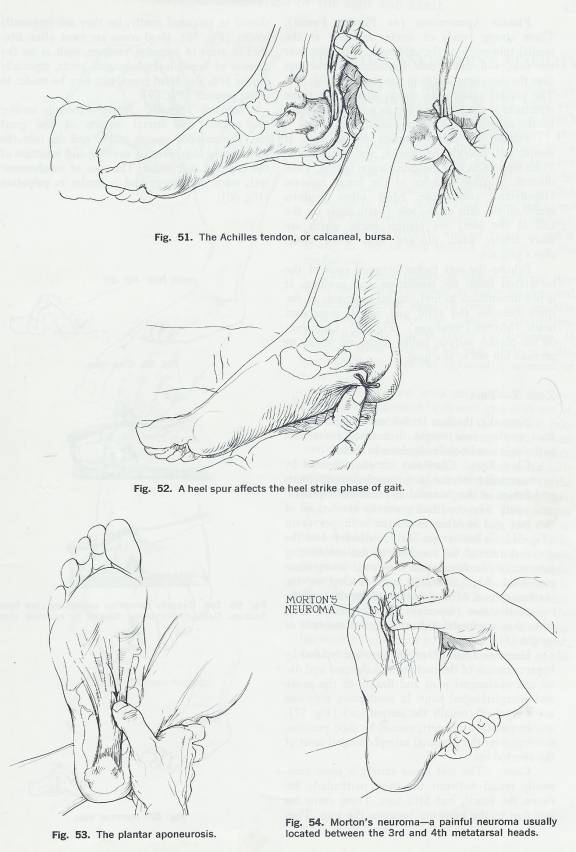
5.6.9.2.3.3 Locate this bursa by lifting the skin posterior to the tendon-the bursa lies directly between your fingers. . (Fig. 51)
5.6.10 Figures 49 & 50
5.6.10.1
5.6.11 Figures 51, 52, 53, & 54
5.6.11.1
5.6.12 Zone 9 Plantar Surface of the Foot
5.6.12.1 Introduction
5.6.12.1.1 The central bony prominence in the area of the Hindfoot is the broad medial tubercle of the calcaneus.
5.6.12.1.2 Most of the muscles of the plantar surface of the foot originate from this bone.
5.6.12.1.3 Their origins are not palpable because of the thick pad of fat covering the bone. This area should be palpated because of the possibility of a heel spur protruding from the medial tubercle and its attendant bursa, both of which cause tenderness and affect the heel strike phase of gait. (Fig. 52)
5.6.12.2 Plantar Aponeurosis (or Plantar Fascia)
5.6.12.2.1 These strong bands of connective tissue originate at the medial (plantar aponeurosis) and lateral (lateral plantar aponeurosis) tuberosity of the calcaneus, splay out over the sole, and insert into Ligamentous structures near the metatarsal heads in the forefoot (Fig. 53) (plantar aponeurosis) and into the base of the 5th metatarsal bone (lateral plantar aponeurosis).
5.6.12.2.2 The plantar aponeurosis covers many of the soft tissue structures of the foot, and acts as a virtual tie beam for the support of the medial longitudinal arch.
5.6.12.2.3 The plantar Fascia covers the remaining structures of the foot extends over the medial and lateral side of the PA and covers the abductor Hallucis (hǎ-li-cis) on the medial side and abductor Digiti Minimi (dĭgĭtĭ mĭnĭmĭ) on the lateral side.
5.6.12.2.4 Palpate the plantar surface of the foot. It should feel smooth, nontender, and nonnodular. Point tenderness may indicate plantar Fasciitis, while discrete palpable nodules in the fascia indicate Duputyren’s contracture.
5.6.12.2.5 Most often, nodules found on the skin of the sole (particularly on the ball of the foot) are plantar warts, which are more tender when pinched than when under direct pressure.
5.6.12.2.6 Palpate the soft tissues between each of the metatarsal heads for tenderness and swelling. It is not uncommon to find painful neuromas in the space between the third and fourth metatarsal heads (Morton’s neuroma). Palpate the base of the 5th metatarsal bone as the lateral cord of the plantar aponeurosis attaches here (Fig. 54).
5.6.12.2.7 Callosities on the plantar surface, unlike warts, are tender to pressure but not to pinching.
5.6.13 Zone 10 Toes
5.6.13.1 Normally, the toes lie flat and straight on the floor as they bear weight. But there are several pathologic conditions indigenous to them.
5.6.13.2 Claw Toes
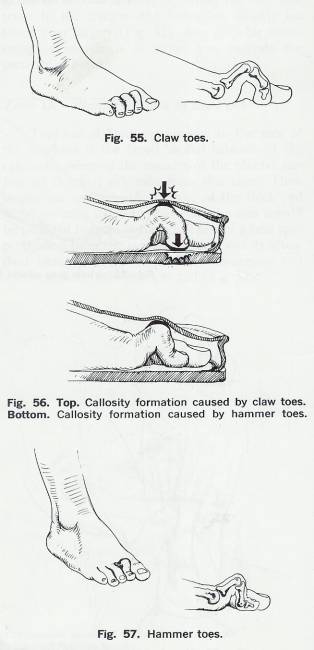
5.6.13.2.1 Claw toes are characterized by hyperextension of the metatarsophalangeal joints and flexion of the proximal and distal Interphalangeal joints. The condition generally involves all of the toes and is often associated with pes cavus (Fig. 55). Callosities are likely to develop over the dorsal surface of the toes due to the constricting pressure of the shoes upon the flexed Interphalangeal joint. Also, callosities may develop on the plantar surface of the metatarsal heads and the tips of the toes (especially on the second toe), since they are forced to bear excessive amounts of weight (Fig. 56).
5.6.13.3 Hammer Toes
5.6.13.3.1 Hammertoes are typified by hyperextension of the metatarsophalangeal and distal Interphalangeal joint and flexion of the proximal Interphalangeal joint. In most cases, only one toe is involved (usually the second toe) (Fig. 57), and frequently a callosity, caused by shoe pressure, develops over the proximal Interphalangeal joint of the affected toe.
5.6.13.4 Corns
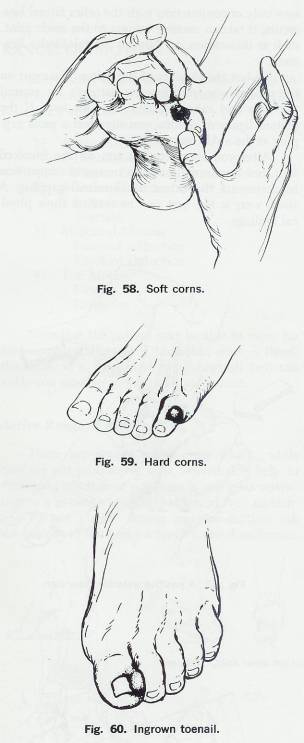
5.6.13.4.1 The soft tissue variety is more commonly found between the toes, particularly between the fourth and fifth toes. These corns are soft due to the moisture between the toes. They should be palpated gently, for they are frequently tender (Fig. 58). Hard corns are most often situated in areas of excessive pressure, such as on the dorsum of flexed Interphalangeal joints, especially on the fifth toe. Hard corns, too, may be tender to direct pressure (Fig. 59).
5.6.13.5 Ingrown Toenails
5.6.13.5.1 Ingrown toenails involve the medial and lateral aspects of the great toe. The anterior corners of the nail dig into the surrounding skin, causing swelling and infection of the adjacent soft tissue. The area of involvement feels warm and boggy and is tender to palpation (Fig. 60).
5.6.14 Figures 55, 56, and 57
5.6.14.1
5.6.15 Figures 58, 59, and 60
5.6.15.1
5.7 Tests for Ankle Joint Stability
5.7.1 Since the ankle joint bears weight and is important for walking, it must be both stable and mobile. Inversion or eversion sprains can stretch or tear the joint's supporting ligaments and produce instability. Excessive inversion stress is the most common cause of ankle injury for two anatomic reasons:
5.7.1.1 The medial malleolus is shorter than the lateral malleolus, and the talus can thus be forced to invert farther than it can evert;
5.7.1.2 The ligamentous thickenings on the lateral side of the joint are separate, and are therefore not as strong as the massive deltoid ligament on the medial side.
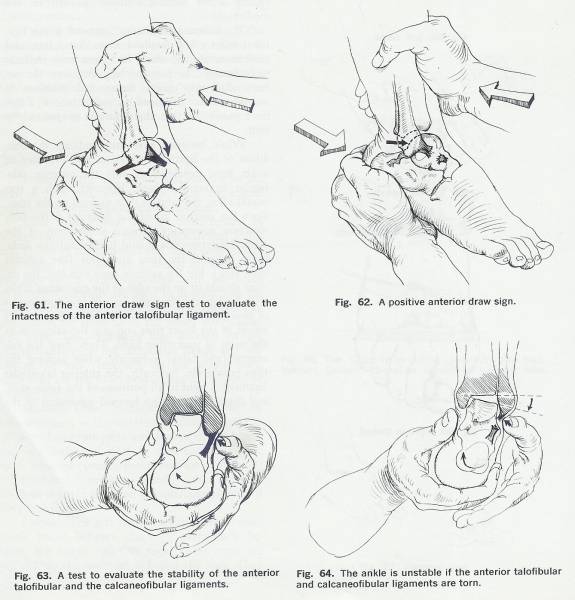
5.7.2 The anterior talofibular ligament is the ligament most often involved in ankle sprains, and tenderness elicited along its course may indicate such damage. To test the ligament, turn the patient's foot into plantar flexion and inversion. If inversion stress increases his pain, there is a distinct possibility that the ligament is sprained or torn.
5.7.3 While inversion stress may indicate the condition of the ligament, it cannot give evidence of ankle joint instability if only the anterior talofibular ligament is torn. However, such a tear would allow the talus to slide forward on the tibia, since the anterior talofibular ligament is the only structure preventing forward Subluxation of the talus. Therefore, you should test for anterior instability between the tibia and talus (the anterior draw sign). For the anterior draw sign test, the patient should sit on the edge of the examining table, with his legs dangling and his feet in a few degrees of plantar flexion. Place one hand on the anterior aspect of the lower tibia and grip the calcaneus in the palm of your other hand. Then, draw the calcaneus (and talus) anteriorly, while pushing the tibia posteriorly. Normally, the anterior talofibular ligament is tight in all positions of the ankle joint, and there should be no forward movement of the talus on the tibia (Fig. 61). Under abnormal conditions, however, the talus slides anteriorly from under the cover of the ankle mortise (positive draw sign); you may even feel a "clunk" as it moves (Fig. 62).
5.7.4
The anterior talofibular and the
calcaneofibular ligaments must both be torn to produce gross lateral ankle
instability. To check the integrity of these ligaments, invert the calcaneus;
if the talus gaps and rocks in the ankle mortise, the anterior talofibular and
calcaneofibular ligaments are damaged with resultant lateral ankle instability (Figs. 63, 64).
5.7.5 The posterior talofibular ligament can be torn only in conjunction with the other lateral ligaments; it takes a massive trauma to the ankle joint, such as dislocation, to damage the talofibular ligament.
5.7.6 To test the stability of the deltoid ligament on the medial side, stabilize the patient's leg around the tibia and calcaneus and evert his foot. If the deltoid ligament is torn, you may feel a gross gapping at the ankle mortise.
5.7.7 After you complete the test on the involved foot, test the normal one as a means of comparison to determine the extent of abnormal gapping. A stress x-ray is the best way to confirm these physical findings.
5.8 Range of Motion
5.8.1 Movements of the foot and ankle almost invariably involve more than a single joint. The basic ankle and foot motions are:
5.8.1.1 Ankle Motion Dorsiflexion Plantar flexion
5.8.1.2 Subtalar Motion Inversion Eversion
5.8.1.3 Midtarsal Motion Forefoot adduction Forefoot abduction
5.8.1.4 Toe Motion Flexion Extension
5.8.2 Note that the patient may be able to move his foot considerably even if his ankle joint is fused; therefore, it is important to distinguish between ankle and subtalar or midtarsal movement.
5.8.3 Figures 61, 62, 63, and 64
5.8.3.1
5.8.4 Active Range of Motion
5.8.4.1 There are several quick tests, which, while they are not pure active tests, nevertheless help to determine whether or not there is any gross restriction in a patient's range of ankle and foot motion.
5.8.4.2 To test plantar flexion and toe motion, ask the patient to walk on his toes to test dorsiflexion, instruct him to walk on his heels. To test inversion, have him walk on the lateral borders of his feet; to test eversion, instruct him to walk on the medial borders of his feet (Fig. 65). Although these quick tests can satisfactorily indicate functional abnormality, they do not permit precise measurement or evaluation of separate motion.
5.8.4.3 If your patient is unable to perform any of these procedures, you should conduct passive testing to determine the cause of his limited range of motion.
5.8.5 Passive Range of Motion
5.8.5.1 Ankle Dorsiflexion =20° Ankle Plantar Flexion = 50°
5.8.5.1.1 Dorsiflexion and plantar flexion take place between the talus and the tibia and fibula within the ankle mortise. A line drawn between the midpoints of the medial and lateral malleoli approximates the axis of ankle joint motion.
5.8.5.1.2 Instruct the patient to sit on the edge of the examining table and to let his legs dangle. Since his knees are bent, the gastrocnemius is relaxed (its origin and insertion are brought closer together) and is eliminated as a possible restriction of dorsiflexion. Stabilize the subtalar joint by holding the calcaneus. Then, to ensure that ankle motion alone takes place and that there is no substitution of forefoot motion, invert the forefoot to lock it onto the hindfoot. Now, as you grip the forefoot, push the foot as one unit into dorsiflexion and plantar flexion (Figs. 66, 67).
5.8.5.1.3 When the foot is plantar flexed, there is normally a slight degree of lateral talar mobility between the malleoli. While this motion is difficult to record, it should be noted. The dorsum of the talus fits into a socket, or mortise, formed by the tibia or fibula, and both its socket and the talus are wider anteriorly. When the ankle is dorsiflexed, the talus is held tightly between the two malleoli. But when the ankle is plantar flexed, the narrower posterior portion lies between the malleoli, and there is a slight degree lateral mobility. If the intermalleolar distance has narrowed secondary to trauma, or if the foot and ankle have been cast in a position of equinus for a prolonged period (contracting the intermalleolar distance), the wider anterior portion of the talar dome may no longer fit easily into the mortise, and dorsiflexion could be restricted (Fig. 68).
5.8.5.1.4
Restricted ankle movement may also be caused by
extra-articular swelling (edema secondary to sprain or to cardiac failure);
such swelling can constrict the ankle almost as if it were bandaged or placed
in a cast. Intra-articular swelling also reduces ankle motion (Fig. 69), as
does a fusion of the ankle joint or a contracted joint capsule (Figs. 70, 71).
5.8.5.2 Figures 65, 66, and 67
5.8.5.2.1 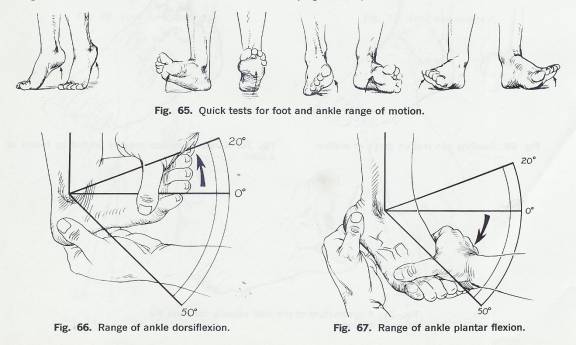
5.8.5.3 Figures 68, 69, 70, & 71
5.8.5.3.1 
5.8.5.4 Subtalar Inversion=5° Subtalar Eversion=5°
5.8.5.4.1 These motions adjust the foot so that it can function on uneven surfaces. The motions take place primarily at the talocalcaneal, talonavicular, and calcanecuboid joints. To test inversion and eversion, have the patient remain seated on the edge of the examining table and stabilize his tibia by holding it around its distal end. Then, grip the calcaneus, and alternately invert and evert the heel (Figs. 72, 73). A patient who has subtalar arthritis (secondary, perhaps, to a calcaneal fracture extending to the subtalar joint) may complain of pain during this motion. There is a distinct and obvious difference between the subtalar motions of younger and older patients.
5.8.5.5 Forefoot Adduction=20° Forefoot Abduction=10°
5.8.5.5.1 The motions of forefoot adduction and abduction take place primarily at the midtarsal joint (the talonavicular and calcaneocuboid joints). To test these motions, hold the patient's foot at the calcaneus with one hand to stabilize the heel in the neutral position during the test, and move the forefoot medially and laterally with your free hand. This range of motion is difficult to measure accurately, but it can be felt (Figs. 74, 75).
5.8.5.5.2 Although the motions of inversion and eversion may be tested independently from those of abduction and adduction, under normal circumstances the four movements are combined, with inversion almost invariably accompanied by adduction (called "supination"), and eversion by abduction (called "pronation").
5.8.5.6 Figures 72, 73, 74, and 75
5.8.5.6.1 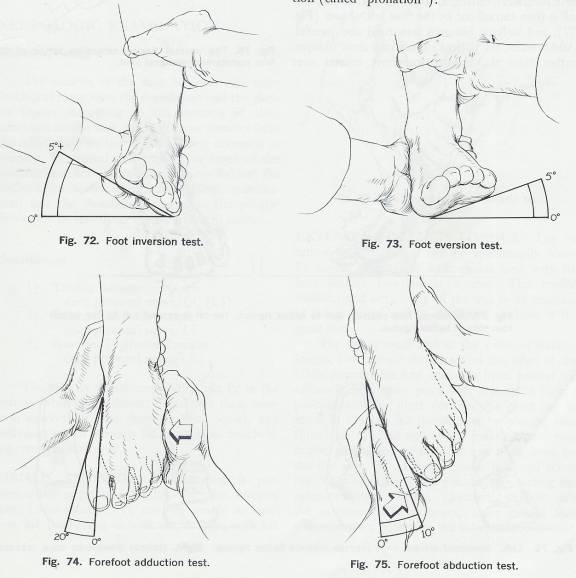
5.8.6 First Metatarsophalangeal Joint
5.8.6.1 Flexion=45° Extension=70°-90°
5.8.6.1.1 Since it is principally involved with the toe off phase of gait, the first metatarsophalangeal joint is crucial to normal ambulation. To test it, stabilize the patient's foot and move his great toe through flexion and extension at the metatarsophalangeal joint (Fig. 76). Normal toe-off requires a minimum of 35° to 40° of extension.
5.8.6.1.2 If motion is markedly reduced in the first metatarsophalangeal joint or if the joint is fused or partially fused (hallux rigidus), the patient may walk with a protective gait, shortening the toe-off (push-off) phase, stepping with an oblique bend to the foot, and avoiding motion or pressure on the first metatarsophalangeal joint. In that event, toe off is then carried out by the four lateral toes (Fig. 77), and walking becomes unnatural and painful. Additionally, the patient's shoes may show oblique, rather than the normal transverse creases over the toes (Fig. 78). In the case of hallux rigidus, any attempt to extend the toe may produce minimal motion while causing severe pain. Flexion, however, may be almost normal.
5.8.6.1.3 The proximal interphalangeal joint of the great toe is capable only of flexion (approximately 90°).
5.8.6.2 Figure 76
5.8.6.2.1 
5.8.6.3 Figures 77 & 78
5.8.6.3.1 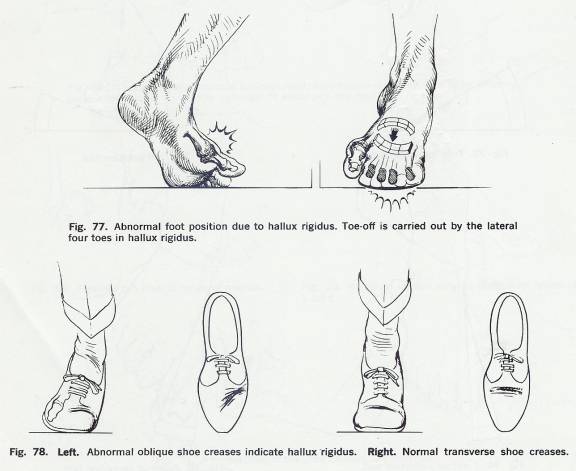
5.8.7 Motion of the Lesser Toes
5.8.7.1 Although active flexion in the lesser toes takes place at the distal and proximal interphalangeal joints, active extension normally takes place only at the metatarsophalangeal joints. Thus, all four of the lesser toes should be extended and flexed passively, both at the metatarsophalangeal and at the proximal and distal interphalangeal joints. Normally, individuals flex their toes to grasp the ground or their shoes to gain extra stability during the stance phase of gait.
5.8.7.2 Claw toes restrict extension in the proximal and distal interphalangeal joints and flexion in the metatarsophalangeal joint, while hammertoes restrict flexion in the distal interphalangeal joint, extension in the proximal interphalangeal joint, and flexion at the metatarsophalangeal joint.
5.9 Neurologic Examination
5.9.1 Muscle Testing
5.9.1.1 The muscles of the foot fall into two main functional categories: the dorsi flexors and the plantar flexors. According to the location of their insertions on the foot, many of these muscles have the additional function of performing inversion or eversion. In general, the tendons in front of the malleoli dorsiflex the foot, and those behind the malleoli plantar flex it. In this neurologic examination, first the dorsiflexors and then the plantar flexors will be tested, both from lateral to medial.
5.9.1.2 Dorsiflexors
5.9.1.2.1 Tibialis Anterior-Deep peroneal nerve, L4, (L5)
5.9.1.2.2 Extensor Hallucis Longus-Deep peroneal nerve, L5
5.9.1.2.3 Extensor Digitorum Longus-Deep peroneal nerve, L5
5.9.1.2.4 The primary dorsiflexors of the foot lie in the anterior tibial compartment. Since they share common innervation (the deep peroneal nerve), any pathology, which prevents the nerve from functioning, results in foot drop.
5.9.1.2.5 Tibialis Anterior
5.9.1.2.5.1 This muscle is predominantly innervated by L4, but also receives some L5 innervation. To test the muscle in function, ask the patient to walk on his heels with his feet inverted. The tendon of the tibialis anterior muscle can be seen where it crosses the anteromedial portion of the ankle joint; it is quite prominent distally toward its insertion. Individuals having weak tibialis anterior muscles are unable to perform this functional dorsiflexion-inversion test, and may exhibit "drop-foot" or steppage gait.
5.9.1.2.5.2 For the manual test of the tibialis anterior muscle the patient should sit on the edge of the examination table. Support his lower leg, and place your thumb near the dorsum of his foot in such a position that he must dorsiflex and invert his foot to reach it. Then try to force his foot into plantar flexion and eversion by pushing against the first metatarsal head and shaft. Palpate the tibialis anterior muscle as you perform the test (Fig. 79).
5.9.1.2.6 Figure 79
5.9.1.2.6.1 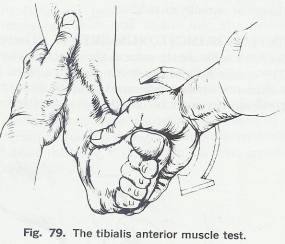
5.9.1.2.7 Extensor Hallucis Longus
5.9.1.2.7.1 The extensor hallucis longus can be functionally tested by having the patient walk on his heel, with his foot neither inverted nor everted. The tendon should stand out clearly all the way to its insertion at the proximal end of the distal phalanx of the great toe.
5.9.1.2.7.2 For the manual test of the extensor hallucis longus, the patient should sit on the edge of the table. Support his foot with one hand around the calcaneus and again place your thumb in such a position that he must dorsiflex his great toe to reach it. Oppose his dorsiflexion by placing your thumb on the nail bed of the great toe and your fingers on the ball of the foot and push down on the toe (Fig. 80). If your thumb is placed across the interphalangeal joint, you are also testing the extensor hallucis brevis. Therefore, to test only the extensor hallucis longus, make certain that your resistance is distal to the interphalangeal joint.
5.9.1.2.8 Extensor Digitorum Longus
5.9.1.2.8.1 The tendon of this muscle is the third most prominent of the dorsiflexors. To test it in function, instruct the patient to walk on his heel as he did for the extensor hallucis longus muscle test. The tendon should stand out on the dorsum of the foot, crossing in front of the ankle mortise and fanning out to insert, by slips, into the dorsal surfaces of the middle and distal phalanges of the four lateral toes.
5.9.1.2.8.2 For the manual test, the patient should sit on the edge of the table. Secure his foot around the calcaneus and place the thumb of your free hand in such a position that he must extend his toes to reach it. Then, oppose his motion by pressing on the dorsum of the toes and by attempting to bend them plantarward (Fig. 81). The toes should be virtually unyielding.
5.9.1.2.9 Extensor Digitorum Brevis
5.9.1.2.9.1 The tests for this muscle are the same as those for the longus. The muscle belly of the brevis can be palpated for consistency where it bulges out from the sinus tarsi. However, it cannot be isolated for muscle testing.
5.9.1.3 Figures 80 & 81
5.9.1.3.1 
5.9.1.4 Figure 82
5.9.1.4.1 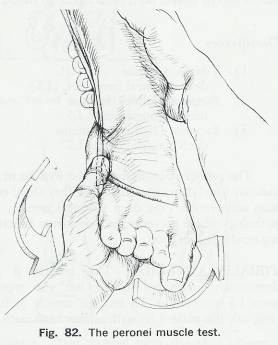
5.9.1.4.2 Plantar Flexors
5.9.1.4.2.1 Peroneus Longus and Brevis
5.9.1.4.2.1.1 Superficial peroneal nerve, S1
5.9.1.4.2.2 Gastrocnemius and Soleus
5.9.1.4.2.2.1 Tibial nerve, S1, S2
5.9.1.4.2.3 Flexor Hallucis Longus
5.9.1.4.2.3.1 Tibial nerve, L5
5.9.1.4.2.4 Flexor Digitorum Longus
5.9.1.4.2.4.1 Tibial nerve, L5
5.9.1.4.2.5 Tibialis Posterior
5.9.1.4.2.5.1 Tibial nerve, L5
5.9.1.4.3 Peroneus Longus and Brevis
5.9.1.4.3.1 The tendons of these muscles are the first two tendons posterior to the lateral malleolus. They should be tested in function simultaneously. Since they are the everters of the foot and ankle, ask the patient to walk on the medial borders of his feet. As he does so, the tendons of the Peronei should become prominent where they turn around the lateral malleolus, pass on either side of the peroneal tubercle (the brevis above, the longus below), and run to their respective insertions.
5.9.1.4.3.2 For the manual test of the peronei, the patient should sit on the edge of the table. Secure his ankle by stabilizing the calcaneus and place your other hand in a position that forces him to plantar flex and evert his foot to reach it with his small toe. Then, oppose his plantar flexion and eversion by pushing against the fifth metatarsal head and shaft with the palm of your hand (Fig. 82).
5.9.1.4.3.3
(Avoid applying pressure to the toes, since they may
move.)
5.9.1.4.4 Gastrocnemius and Soleus
5.9.1.4.4.1 The common tendon of insertion for the gastrocnemius and soleus muscles is the most prominent tendon behind the malleoli. Because the gastrocsoleus unit is stronger than all the other leg muscles combined, it is difficult to detect existing weakness by manual muscle testing. Therefore, observe these muscles in function. First, ask the patient to walk on his toes, an act he will be unable to perform if there is gross muscle weakness. Then instruct him to jump up and down on the balls of his feet, one at a time, to force the calf muscles to support almost two and one-half times the body's weight. If he lands flat-footed or is otherwise incapable of performing this test, there is probably at least minimal weakness in the calf muscle (Fig. 83). Elderly individuals or patients with backaches should not be expected to perform this functional test.
5.9.1.4.5 Flexor Hallucis Longus
5.9.1.4.5.1 This muscle lies medial to the Achilles tendon. To evaluate its function, simply observe the patient's gait. The muscle's action is integral to the smooth toe-off phase of gait. There is no other functional method that tests this muscle.
5.9.1.4.5.2 For the manual test of the flexor hallucis longus, have the patient sit on the edge of the table, and support his foot by stabilizing the calcaneus. Then instruct him to bend or curl his great toe, and oppose this plantar flexion. Repeat the procedure on the opposite foot and compare the relative strengths of the two muscles.
5.9.1.4.6 Flexor digitorum Longus
5.9.1.4.6.1 This tendon lies immediately medial to the flexor hallucis longus tendon. There is no accurate method by which to test it in function. Test it manually by stabilizing the calcaneus and having the patient bend or curl his toes. Oppose this flexion by trying to bend the toes into dorsiflexion. Again, the toes should be unyielding.
5.9.1.4.7 Tibialis Posterior
5.9.1.4.7.1 This tendon lies just posterior to the medial malleolus. While the muscle is difficult to isolate for testing in function, its tendon is palpable as it comes around the medial malleolus and inserts into the navicular tubercle. A combination of plantar flexion and inversion makes the tendon stand out quite clearly.
5.9.1.4.7.2 For the manual test of the tibialis posterior, have the patient sit on the examination table and stabilize his foot. Then, have him plantar flex and invert his foot while you resist his motion. If the tibialis posterior is stronger than the other tendons around the ankle, it can deform the foot, especially in children.
5.9.1.5 Fig 83
5.9.1.5.1 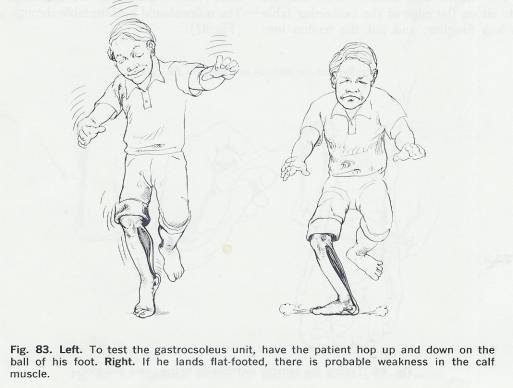
5.9.2 Sensation Tests
5.9.2.1 Sensation to the skin over the lower leg and foot is supplied by nerves emanating from the lumbar and sacral regions. The areas which are supplied by each particular neurologic level can be broadly defined as bands, or dermatomes, that cover certain areas of the skin. The L4 dermatome crosses the knee joint and covers the medial side of the leg (medial to the crest of the tibia, the medial malleolus, and the medial side of the foot). The L5 dermatome covers the lateral side of the leg (lateral to the crest of the tibia) and the dorsum of the foot. The S1 dermatome covers the lateral side of the foot (Fig. 84).
5.9.2.2 The sensation of each peripheral nerve should be tested as it innervates the dorsum of the foot. The medial side of the foot is supplied by the saphenous nerve, the dorsum by the peroneal nerve, and the lateral side by the sural nerve (Fig. 85).
5.9.3 Reflex Tests
5.9.3.1 Achilles Tendon Reflex (S1)
5.9.3.1.1 The Achilles tendon reflex is a deep tendon reflex, mediated through the gastrocnemius-soleus muscles. It is supplied predominantly by nerves emanating from the S1 cord level. If the S1 root is cut or compressed, the Achilles tendon reflex is virtually absent.
5.9.3.1.2 To test the Achilles tendon reflex, ask the patient to sit on the edge of the examining table with his legs dangling, and put the tendon into slight stretch by gently dorsi flexing the foot. Then, to locate the tendon accurately, place your thumb and fingers into the soft tissue depressions on either side of it. Tap the tendon with the flat end of a neurologic hammer, using a wrist-flexing action to induce a sudden, involuntary plantar flexion of the foot (Fig. 86). It is sometimes helpful to reinforce the reflex by having the patient attempt to pull his clasped hands apart (or push them together) just as the tendon is struck.
5.9.3.1.3 There are several alternative methods of testing the Achilles tendon reflex, some of which are described below. The selection of an appropriate method depends, of course, upon the patient's condition.
5.9.3.1.4 If he is bedridden, cross his leg over his opposite knee so that the ankle joint is free. Prime the tendon by slightly dorsiflexing the foot. Then strike the tendon of Achilles using the flat end of the neurologic hammer. The reflex may be reinforced, if necessary.
5.9.3.1.5 If the patient is lying prone in bed, ask him to flex his knee to 90º and prime the tendon by slightly dorsiflexing the foot. Then strike the Achilles tendon.
5.9.3.1.6 If the ankle joint is swollen, or if it would be prohibitively painful to tap the Achilles tendon directly, test the ankle reflex by having the patient lie prone with his ankle over the edge of the bed or examination table. Press against the ball of your patient's foot with your fingers to dorsiflex it, and strike your fingers with the neurologic hammer. The reflex should be detectable through your hand (Fig. 87). .
5.9.3.1.7
5.9.3.2 Figure 84
5.9.3.2.1 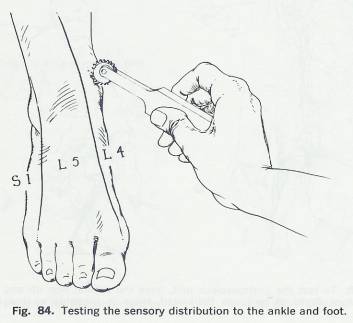
5.9.3.3 Figures 85, 86, & 87
5.9.3.3.1 
5.10 Special Tests
5.10.1 Test for Rigid or Supple Flat Feet
5.10.1.1 Observe the patient's feet as he stands on his toes and while he is seated. If the medial longitudinal arch is absent in all positions, the patient has rigid flat feet. If the arch is present while he is on his toes or sitting and absent only when he stands, his flat feet are supple and are correctable with longitudinal arch supports (Figs. 88, 89).
5.10.2 Tibial Torsion Test
5.10.2.1 In children, toeing in may be caused by excessive internal rotation of the tibia. If you suspect tibial torsion, you must first locate the fixed bony points at either end of the tibia: the tibial tubercle below the knee and the two malleoli at the ankle. Normally, a line drawn between the malleoli is rotated externally 15° from a .a perpendicular line drawn from the tibial tubercle to the ankle. If there is internal tibial torsion, the malleolar line may face directly anteriorly, close to the perpendicular line (Figs. 90, 91,92).
5.10.3 Figures 88 & 89
5.10.3.1
5.10.4 Figures 90, 91, & 92
5.10.4.1
5.10.5 Figures 93 & 95
5.10.5.1
5.10.6 Figures 94 & 96
5.10.6.1
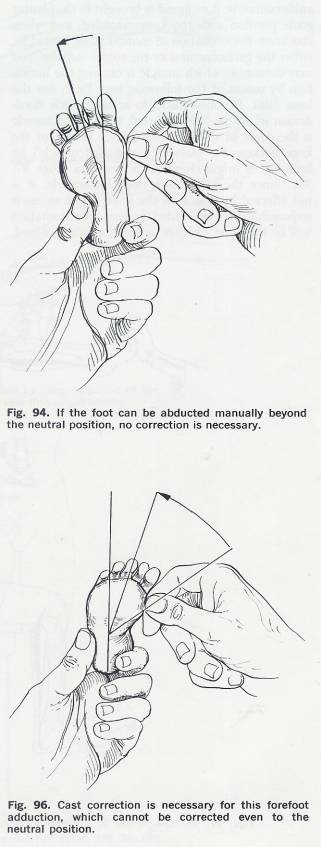
5.10.7 Forefoot Adduction Correction Test
5.10.7.1 Forefoot adduction in children mayor may not need correction (Fig. 93). If you can manually correct the adduction and abduct the forefoot beyond the neutral position, no treatment will be necessary since the foot will ultimately correct itself (Fig. 94). If, however, you can only partially correct the forefoot to the neutral position or less, the foot will probably not correct itself, and cast correction is necessary (Figs. 95, 96)
5.10.8 Ankle Dorsiflexion Test
5.10.8.1 When the ankle cannot be dorsiflexed or brought to the plantar grade position with the knee extended, and when you know the limitation of motion to be caused by either the gastrocnemius or the soleus muscles, you may determine which muscle is causing the limitation by means of the following test. First, flex the knee joint. If you are able to achieve ankle dorsiflexion when the knee is flexed, the gastroc muscle is the cause of the limitation, since flexion of the knee slackens the gastroc (a two-joint muscle) by bringing its origin closer to its insertion (Figs. 97, 98). Since the soleus is a one-joint muscle, it is not affected by flexion of the knee; if the soleus is responsible for the limited motion, the limitation will be the same whether or not the knee is flexed.
5.10.9 Homans’ Sign
5.10.9.1 To test for deep vein thrombophlebits, forcibly dorsiflex the patient's ankle when his leg is extended. Pain in the calf resulting from this maneuver indicates a positive Homans' sign. Tenderness elicited upon deep palpation of the calf muscle is further evidence of deep vein thrombophlebits (Figs. 99, 100).
5.11 Examination Of Related Areas
5.11.1 All the other joints in the lower extremity should be examined in conjunction with a complete examination of the foot and ankle, since it is possible for pathology in the knee, hip, or lumbar region to refer pain to the foot and ankle (Fig. 101).
5.11.2 Figures 97, & 98
5.11.2.1
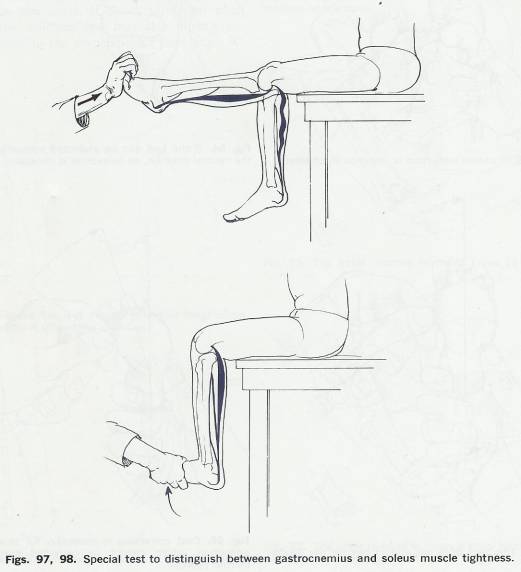
5.11.3 Figures 99, 100, & 101
5.11.3.1
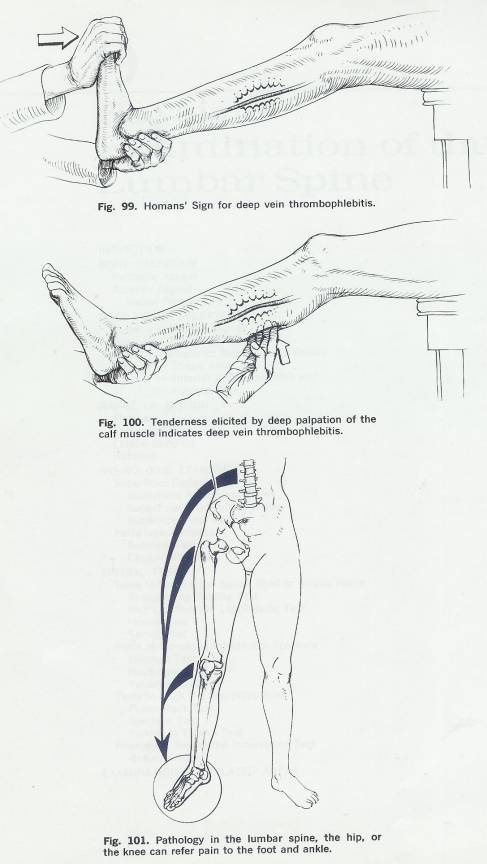
5.12 Wheeless' Textbook of Orthopaedics
5.12.1 http://www.wheelessonline.com/
5.12.2 http://www.wheelessonline.com/ortho/menu_for_the_tibia_tibia_frx
5.12.3 http://www.wheelessonline.com/ortho/__112
5.12.4 http://www.wheelessonline.com/ortho/__109
5.13 Merck Manual
5.13.1 http://www.merck.com/mrkshared/mmanual/section5/chapter60/60a.jsp
6 Temporomandibular Joint
Back
Table of Contents References
7 Lumbar Spine
Back Table of
Contents References
7.1 Evaluation (Kessler)
7.1.1 History
7.1.1.1 Signs and Symptoms
7.2 Physical Examination Merck THE MERCK MANUAL, Sec. 5, Musculoskeletal and Connective Tissue Disorders
7.2.1 Vertebral column
7.2.2 Diagnosis
7.2.2.1
Blood tests
7.2.2.2 X-rays
7.2.3 Pain THE MERCK MANUAL, Sec. 14, Ch. 167, Pain
7.2.3.1 Acute
7.2.3.2 Chronic
7.2.3.3
Neuropathic pain
7.2.4 Evaluation of Pain
7.2.5 Cancer Pain
7.2.6 Neuropathic Pain
7.3 Neurologic Approach to Patient Merck
7.3.1 General
7.3.1.1 History
7.3.1.2 Neurologic Examination
7.3.1.2.1 Mental status examination
Cranial nerve examination
7.3.1.2.2 Examination of the motor
system
7.3.1.2.2.1 Fasciculations
7.3.1.2.3 Assessment of muscle strength
7.3.1.2.4 Examination of coordination,
stance, and gait
7.3.1.2.5 Sensory testing
7.3.1.2.6 Reflex testing
7.3.1.2.7 Autonomic system testing
7.3.1.2.8 Cerebrovascular examination
7.3.1.3 Neurologic Diagnostic Procedures
7.3.1.3.1 Lumbar puncture (spinal tap):
7.3.1.3.2 Computed tomography
7.3.1.3.3 Magnetic resonance imaging
7.3.1.3.4 Magnetic resonance angiography (MRA)
7.3.1.3.5 Magnetic resonance venography
7.3.1.3.6 Echoencephalography
7.3.1.3.7 Positron emission tomography
(PET)
7.3.1.3.8 Cerebral angiography
7.3.1.3.9 Duplex Doppler
ultrasonography
7.3.1.3.10
Myelography
7.3.1.3.11 Electroencephalography: EEG
7.3.1.3.12
Measurement of evoked responses
7.3.1.3.13 Electromyography and nerve conduction velocity studies
7.4 Inspection
7.4.1 Movement Abnormalities
7.4.1.1 Fluidity of Movement
7.4.1.1.1 Splinting
7.4.1.1.2 Movement Avoidance (Antalgic)
7.4.2 Skin Abnormalities
7.4.2.1 Redness & Unusual Skin Markings
7.4.2.2 Fatty Masses
7.4.2.3 Hair Patches
7.4.2.4 Skin Tags
7.4.2.5 Birth Marks
7.4.2.6
7.4.3 Postural Abnormalities
7.4.3.1 Body Type
7.4.3.1.1 Ectomorphic
7.4.3.1.2 Mesomorphic
7.4.3.1.3 Endomorphic
7.4.3.1.4 Mixed
7.4.3.2 Angular Kyphosis (Gibbus Deformity)
7.4.3.3 Spondylolisthesis
7.4.3.4 Displacement of Disc Material
7.4.3.5 Postural Lumbago
7.4.3.6 Horizontal Pelvis Leg Length Inequity
7.5 Assessment of Structural Alignment Kessler
7.5.1 Frontal Alignment (Posterior Viewing)
7.5.1.1 Horizontal Asymmetry
7.5.1.1.1 Using the Plumb Bob
7.5.1.1.2 Lateral Shift
7.5.1.1.2.1 Leg Length Inequity (On the side of the Shift)
7.5.1.1.2.2 Tight Hip Abductors (Iliotibial Band?)
7.5.1.1.2.3 Loss of Hip Abduction (On side of Shift)
7.5.1.1.3 Valgus/Varus Deviations or Asymmetries
7.5.1.1.3.1 Bilateral Genu Valgum (Knock Knees)
7.5.1.1.3.2 Unilateral Genu Varum
7.5.1.1.3.3 Tibial Varum
7.5.1.1.3.4 Calcaneal Valgum
7.5.1.1.3.5 Calcaneal Varum
7.5.1.1.4 Muscle Mass Asymmetries
7.5.1.1.5 Lateral Spinal Curvatures
7.5.1.1.5.1 Lateral Pelvic Inclination
7.5.1.1.5.2 Lateral Pelvic Shift
7.5.1.1.5.3 Acute Spinal Derangement (Disk prolapse or facet-joint dysfunction)
7.5.1.1.5.4 Asymmetrical Lumbar Degenerative Changes
7.5.1.1.5.5 Structural Thoracolumbar Scoliosis
7.5.1.1.6 Leg Length Inequities (Segmental Vertical asymmetries)
7.5.1.1.6.1 Medial Malleoli
7.5.1.1.6.2 Fibular heads and Popliteal Folds
7.5.1.1.6.3 Greater Trochanters
7.5.1.1.6.4 Posterior-Superior Iliac Spines
7.5.1.1.6.4.1 Posterior iliac Torsion
fff
7.5.1.1.6.4.2 ASIS & PSIS higher on femoral valgus side
7.5.1.1.6.4.3 Advanced Hip Degeneration
7.5.1.1.6.5 Iliac Crests
7.5.2 Sagittal Alignment (Side View)
7.5.2.1 Abnormal Extension (Hyperextension)
7.5.2.2 Abnormal Flexion
7.5.2.2.1 Restricted Ankle Plantar Flexion
7.5.2.2.2 Restricted extension of the knee from
7.5.2.2.2.1 Capsular Restriction
7.5.2.2.2.2 Internal Derangement
7.5.2.2.3 Restricted Hip Extension
7.5.2.2.4 Restricted Low-Back Extension
7.5.2.2.4.1 Acute Spinal Derangement
7.5.2.2.4.2 Multisegmental Capsular Restriction
7.5.3 Transverse Rotary Alignment (Front View)
7.5.3.1 Navicular Tubercles
7.5.3.2 Intermalleolar Line
7.5.3.2.1 Excessive External Tibial Torsion or Femoral Anteversion
7.5.3.2.2 Excessive Femoral retroversion or Internal Tibial torsion
7.5.3.3 Patellae
7.5.3.3.1 Medial Facing
7.5.3.3.2 Lateral Facing
7.5.3.4 ASIS
7.5.3.4.1 Fixed (Structural) Spinal Scoliosis
7.5.3.4.2 Torsional Asymmetry of SI Joints
7.6 Muscles Testing and Function Kendall
7.6.1 Length Testing
7.6.1.1 HIP FLEXORS
7.6.1.2 HAMSTRING
7.6.1.2.1 STRAIGHT-LEG-RAISING
7.6.1.2.2 FORWARD BENDING
7.6.1.2.3 1 JOINT HAMSTRING
7.6.1.3 SPINE
7.6.1.3.1 PRONE TRUNK RAISE
7.6.1.3.2 Extension
7.6.1.3.2.1 BACK EXTENSION MUSCLE TEST
7.6.1.3.2.2 STANDING BACK EXTENSION
7.6.1.3.2.3 LATERAL FLEXION
7.6.1.3.3 Flexion
7.6.1.3.3.1 Supine Flexion
7.6.1.3.3.2 STANDING FLEXION
7.6.1.3.4 1 JOINT PLANTAR FLEXION
7.6.1.3.5 2 JOINT PLANTAR FLEXION
7.6.1.3.6 OBER Tensor Facia Lata
7.6.1.3.7 MODIFIED OBER
7.6.2 Postural Analysis
7.6.2.1 Principles
7.6.2.2 The Standard Posture
7.6.2.3 Pelvis and Low Back
7.6.2.4 Hip and Knee Joints
7.6.2.5 Ankle
7.6.2.6 Feet
7.6.2.7 Head and Neck
7.6.2.8 Thoracic Spine
7.6.2.9 Shoulder Joint and Shoulder Girdle
7.6.2.10 Ideal Plumb Alignment Side View
7.6.2.11 Four Type of Postural Alignment
7.6.2.11.1 Ideal Alignment
7.6.2.11.2 Kyphosis Lordosis
7.6.2.11.3 Flat Back
7.6.2.11.4 Sway Back
7.6.2.12 Faulty Plumb Alignment Side View
7.6.2.13 Lordosis
7.6.2.14 Handedness Patterns
7.6.2.15 Faulty Posture Side and Back Views
7.6.2.16 Ideal Segmental Alignment Side View
7.6.2.17 Kyphosis Lordosis Posture
7.6.2.18 Sway Back Posture
7.6.2.19 Military Type Posture
7.6.2.20 Flat Back Posture
7.6.2.21 Ideal Alignment Posture Posterior View
7.6.2.22 Faulty Alignment Posterior View
7.6.2.23 Faulty Alignment Posterior View
7.6.2.24
7.6.3 Muscle Testing
7.7 Thoracolumbar Range of Motion
7.7.1 Flexion
7.7.1.1 PP 89
7.7.1.2 K 8"-10"
7.7.1.3 HHC 60
7.7.1.4 O 90
7.7.1.5 Range 60-90
7.7.1.6 Mean 80
7.7.1.7 Total
7.7.2 Extension
7.7.2.1 PP 30
7.7.2.2 K 2"-4"
7.7.2.3 HHC 25
7.7.2.4 O 30
7.7.2.5 Range 25-30
7.7.2.6 Mean 28
7.7.2.7 Total 108
7.7.3 Lateral Flexion
7.7.3.1 PP 30
7.7.3.2 K F=4"H=K
7.7.3.3 HHC 25
7.7.3.4 O 20
7.7.3.5 Range 20-30
7.7.3.6 Mean 25
7.7.3.7 Total 50
7.7.4 Rotation
7.7.4.1 PP 30
7.7.4.2 K
7.7.4.3 HHC 30
7.7.4.4 O 30
7.7.4.5 Range
7.7.4.6 Mean 30
7.7.4.7 Total 60
7.8 Quick Lesion Analysis (Cyriax)
7.8.1 Joint Signs
7.8.1.1 Passive Extension
7.8.1.2 Passive Lateral Flexion
7.8.1.3 Passive Anterior Flexion
7.8.1.4 Movement to the Table
7.8.2 Dural Signs Dural Mobility
7.8.2.1 Straight –Leg Raising L4-5, S1-2
7.8.3 Root Signs
7.8.3.1 SIJ Stretch
7.8.3.2 Resisted Hip Flexion L2-3
7.8.3.3 Resisted Dorsiflexion L4
7.8.3.4 Resisted Toe Extension L4-5
7.8.3.5 Resisted Eversion L5, S1
7.8.3.6 Knee Jerk Reflex L3
7.8.3.7 Ankle Jerk Reflex S1-2
7.8.3.8 Passive Knee Flexion L3
7.8.3.9 Resisted Knee Extension L3
7.8.3.10 Resisted Knee Flexion S1-2
7.8.3.11 Buttocks Squeeze S1-2
7.8.3.12 Calf Raise S1-2
7.8.3.13 Sensation Testing Plantar Region
7.8.3.14 Plantar Reflex L4-5 S1-2, S4
7.8.3.15 Extension Pressure Sacrum and L1-5
7.8.4 Analysis
7.8.4.1 Capsular Lesions
7.8.4.2 Radiographic Evidence
7.8.4.3 Displacements
7.8.4.4 Disc Lesions: Anomalies
7.9 Bony Palpation-Lumbar Spine
7.9.1 Posterior Aspect
7.9.1.1 Position of the transverse and spinous processes (Kessler)
7.9.1.2 Spinous Processes
7.9.1.3 Sacrum, Sulcus, Sacral hiatus, and coccyx (Kessler)
7.9.1.4 Iliac crest, ischial tuberosity, and hip joint (Kessler)
7.9.1.5 Posterior Aspect of the Coccyx
7.9.2 Anterior Aspect
7.9.2.1 Sacral Promontory
7.10 Soft Tissue Palpation
7.10.1 Muscles of the Gluteal region and sciatic Nerve (Kessler)
7.10.2 Skin and subcutaneous tissue (Kessler)
7.10.3 Area 1-Midline Raphe
7.10.3.1 Supraspinous and Interspinous Ligaments
7.10.3.2 Paraspinal Muscles
7.10.4 Area 2-Iliac Crest
7.10.5 Area 3-Posterior Superior Iliac Spines
7.10.6 Area 4 Sciatic
7.10.6.1 Sciatic Nerve
7.10.7 Anterior Abdominal Wall and Inguinal Area
7.10.7.1 Abdominal Wall, iliac crest and symphysis pubis (Kessler)
7.10.7.2 Inguinal area and femoral triangle (Kessler)
7.10.7.3 Arterial pulses (Kessler)
7.10.7.4 Anterior Abdominal Muscles
7.10.7.5 Inguinal Area
7.11 Spinal Movement
7.11.1 Range of Motion (Hoppenfeld)
7.11.1.1 Flexion
7.11.1.2 Extension
7.11.1.3 Lateral Bending
7.11.1.4 Rotation
7.11.2 Selective Tissue Tension Tests- Active Movements (Kessler)
7.11.1 Active physiological movements of the spine
7.11.1.1.1 Extension
7.11.1.1.1.1 Acute Spinal Derangement
7.11.1.1.1.2 Multisegmental capsular restriction
7.11.1.1.1.3 Localized unilateral capsular restriction
7.11.1.1.2 Lateral Flexion (side bending)
7.11.1.1.2.1 Acute Spinal Derangement
7.11.1.1.2.2 Multisegmental capsular restriction
7.11.1.1.2.3 Localized unilateral capsular restriction
7.11.1.1.3 Flexion (forward bending)
7.11.1.1.3.1 Posterior Disk Prolapse
7.11.1.1.3.2 Facet Joint Dysfunction or Moderate to Mild Disk Prolapse
7.11.1.1.3.3 Fixed Scoliosis (View from back and side)
7.11.1.1.4 Lateral Shift (Side Gliding)
7.11.1.1.5 Rotation
7.11.1.1.6 Chest Expansion and active peripheral joint tests
7.11.1.1.6.1 Measurement
7.11.1.1.6.2 Squatting
7.11.1.1.7 Auxiliary Tests
7.11.1.1.7.1 Passive Overpressure
7.11.1.1.7.2 Repeated Motions
7.11.1.1.7.3 Sustained pressure
7.11.1.1.7.4 Combined Motions
7.11.1.1.7.4.1 Active Motions without overpressure
7.11.1.1.7.4.1.1 Lateral Flexion with extension to the left and right
7.11.1.1.7.4.1.2 Lateral flexion combined with flexion to the right and left
7.11.1.1.7.4.2 Combined movements with passive overpressure
7.11.1.1.7.4.2.1 Combined movements in flexion
7.11.1.1.7.4.2.1.1 Combined movements of forward flexion and right lateral flexion
7.11.1.1.7.4.2.1.2 Combined forward flexion with rotation
7.11.1.1.7.4.2.2 Combined movements in extension
7.11.1.1.7.4.2.2.1 Extension with lateral flexion
7.11.1.1.7.4.2.2.2 Extension and rotation to the right
7.11.1.1.7.5 Positive heel-drop test
7.11.1.1.8 Active segmental mobility
7.11.1.1.8.1 Upper Lumbar spine lateral flexion
7.11.1.1.8.2 L5-S1 lateral flexion
7.11.1.1.8.3 L5-S1 region
7.11.1.2 Selective Tissue Tension- Passive Movements
7.11.1.2.1 Posture Correction
7.11.1.2.2 Quadrant testing
7.11.1.2.3 Passive physiological movements of the spine
7.11.1.2.3.1 Flexion (forward bending)
7.11.1.2.3.2 Extension (backward bending)
7.11.1.2.3.3 Lateral flexion (side bending)
7.11.1.2.3.4 Rotation
7.11.1.2.4 Passive physiological movements with segmental palpation
7.11.1.2.4.1 Flexion-extension (forward and backward bending)
7.11.1.2.4.2 Lateral flexion (side bending)
7.11.1.2.4.3 Rotation
7.11.1.2.5 Segmental mobility
7.11.1.2.5.1 Posteroanterior pressure
7.11.1.2.5.2 Transverse pressure
7.11.1.2.5.3 Posteroanterior unilateral pressure
7.11.1.2.6 Passive sacroiliac and peripheral joint tests
7.11.1.2.6.1 Sacroiliac provocation/mobility tests
7.11.1.2.6.1.1 Posterior rotation
7.11.1.2.6.1.2 Anterior rotation
7.11.1.2.6.1.3 Sacroiliac fixation
7.11.1.2.6.2 Hip joint
7.11.1.2.6.3 Knee joint
7.11.1.3
7.12 Neuromuscular Evaluation
7.12.1 Kessler
7.12.1.1 Sensory (dermatomal) tests
7.12.1.2 Resisted isometric tests (motor, myotomal tests)
7.12.1.2.1 Tests with patient supine
7.12.1.2.1.1 L2 Hip flexion (Iliopsoas)
7.12.1.2.1.2 L3 Knee extension (Quadriceps)
7.12.1.2.1.3 L4 Ankle Dorsiflexion and inversion (Tibialis Anterior)
7.12.1.2.1.4 L5 Great toe extension (Extensor Hallucis longus)
7.12.1.2.1.5 L5-S1 Extension of the toes (Extensor Digitorum longus)
7.12.1.2.1.6 S1 Ankle eversion (Peroneus longus and brevis)
7.12.1.2.2 Tests with patient prone
7.12.1.2.2.1 S2 Knee flexion (hamstrings)
7.12.1.2.2.2 S1 Hip extension (gluteus maximus)
7.12.1.2.3 Tests with patient standing
7.12.1.2.3.1 S1 Plantar flexion (gastrocnemius)
7.12.1.2.3.2 L3 Knee flexion (quadriceps)
7.12.1.3 Dural mobility tests
7.12.1.3.1 Sciatic Nerve
7.12.1.3.1.1 Sitting Tests
7.12.1.3.1.2 Supine tests
7.12.1.3.1.3 Slump Test
7.12.1.3.1.4 Femoral –nerve traction test
7.12.1.4 Reflex Tests
7.12.1.4.1 Plantar reflex test
7.12.1.4.2 Deep-tendon reflexes
7.12.1.5 Test for ankle clonus
7.12.1.6 Balance testing
7.12.1.7
7.12.2 Hoppenfeld
7.12.2.1 Neurologic Levels T12, L1, L2, L3
7.12.2.1.1 Muscle Testing
7.12.2.1.2 Sensation Testing
7.12.2.2 Neurologic Levels L2, L3, L4
7.12.2.2.1 Muscle Testing
7.12.2.2.1.1 Quadriceps L2, L3, L4, Femoral Nerve
7.12.2.2.1.2 Hip Adductor Group L2, L3, L4, Obturator Nerve
7.12.2.3 Neurologic Levels L4
7.12.2.3.1 Muscle Testing
7.12.2.3.1.1 Tibialis Anterior L4, Deep Peroneal Nerve
7.12.2.3.2 Reflex Testing
7.12.2.3.2.1 Patellar Reflex
7.12.2.3.3 Sensation Testing
7.12.2.4 Neurologic Level L5
7.12.2.4.1 Muscle Testing
7.12.2.4.1.1 Extensor Hallucis Longus L5, Deep Peroneal Nerve
7.12.2.4.1.2 Extensor Digitorum Longus and Brevis L5, Deep Peroneal Nerve
7.12.2.4.2 Reflex Testing
7.12.2.4.3 Sensation
7.12.2.5 Neurologic Level S1
7.12.2.5.1 Muscle Testing
7.12.2.5.1.1 Peroneus Longus and Brevis S1, Superficial Peroneal Nerve
7.12.2.5.1.2 Gastrocnemius-Soleus Muscles S1, S2, Tibial Nerve
7.12.2.5.1.3
Gluteus
Maximus S1, Inferior Gluteal Nerve
7.12.2.5.2 Reflex Testing
7.12.2.5.2.1
Achilles
Tendon Reflex
7.12.2.5.3 Sensation Testing
7.12.2.6 Neurologic Level S2, S3, S4
7.12.2.6.1 Sensation Testing
7.12.2.7 Superficial Reflexes
7.12.2.7.1 Superficial Abdominal Reflex
7.12.2.7.2 Superficial Cremasteric Reflex
7.12.2.7.3 Superficial Anal Reflex
7.12.2.8 Pathologic Reflexes
7.12.2.8.1 Babinski Test
7.12.2.8.2 Oppenheim Test
7.12.2.9 Special Tests
7.12.2.9.1 Tests to Stretch the Spinal Cord or Sciatic Nerve
7.12.2.9.1.1 Straight Leg Raising Test
7.12.2.9.1.2 Well Leg Straight Leg Raising Test
7.12.2.9.1.3 Hoover Test
7.12.2.9.1.4 Kernig Test
7.12.2.9.2 Tests to Increase Intrathecal Pressure
7.12.2.9.2.1 Milgram Test
7.12.2.9.2.2 Naffziger Test
7.12.2.9.2.3 Valsalva Maneuver
7.12.2.9.3 Tests to Rock the Sacroiliac Joint
7.12.2.9.3.1 Pelvic Rock Test
7.12.2.9.3.2 Gaenslen’s Sign
7.12.2.9.3.3 Patrick or Fabere Test
7.12.2.9.4 Neurologic Segmental Innervation Test
7.12.2.9.4.1 Beevor’s Sign
7.12.2.10 Examination of Related Area’s
7.13 General Physical Examination (Kessler)
7.14 Other Studies (Kessler)
7.14.1 Roentgenograms and other imaging studies
7.14.1.1 Myelograms
7.14.1.2 Diskography
7.14.1.3 Computed axial tomography (CAT scan)
7.14.1.4 Bone Scanning
7.14.1.5 Other Techniques
7.14.2 Electromyography
7.14.3 Laboratory Tests
7.15 Tests for Nonorganic Back Pain
7.15.1 Distraction Test (leg test or flip test)
7.15.2 Stimulation tests
7.15.2.1 Axial loading
7.15.2.2 Hip and shoulder rotation
7.15.2.3 Kneeling on a stool (Burns test)
7.15.3 Other methods
7.16 Activities of Daily Living
7.17 Computerized Tests
7.18
8 Hip and Pelvis
Back Table of
Contents References
8.1 Bony Palpation
8.1.1 Anterior Aspect
8.1.1.1 Anterior Superior Iliac Spines
8.1.1.2 Iliac Crest
8.1.1.3 Iliac Tubercle
8.1.1.4 Greater Trochanter
8.1.1.5 Pubic Tubercles
8.1.2 Posterior Aspect
8.1.2.1 Posterior Superior Iliac Spines
8.1.2.2 Greater Trochanter
8.1.2.3 Ischial Tuberosity
8.1.2.4 Sacroiliac Joint
8.2 Soft Tissue Palpation
8.2.1 Area 1 Femoral Triangle
8.2.1.1 Inguinal Ligament
8.2.1.2 Femoral Artery
8.2.1.3 Femoral Nerve
8.2.1.4 Femoral Vein
8.2.1.5 Sartorius Muscle
8.2.1.6 Adductor Longus Muscle
8.2.2 Area 2 Greater Trochanter
8.2.2.1 Trochanteric Bursa
8.2.2.2 Gluteus Medius Muscle
8.2.3 Area 3 Sciatic Nerve
8.2.3.1 Sciatic Nerve
8.2.4 Area 4 Iliac Crest
8.2.4.1 Cluneal Nerves
8.2.5 Area 5 Hip and Pelvic Muscles
ffff
8.2.5.1 Flexor Grouping
8.2.5.1.1 Iliopsoas Muscle
Ffff
8.2.5.1.2 Sartorius Muscle
8.2.5.1.3 Rectus Femoris Muscle
8.2.5.2 Adductor Grouping
8.2.5.3 Abductor Grouping
8.2.5.3.1 Gluteus Medius Muscle
8.2.5.4 Extensor Grouping
8.2.5.4.1 Gluteus Maximus
8.2.5.4.2 Hamstring Muscles
9 Cervical Spine
Back Table of
Contents References
10 Examination of Gait
Back Table of
Contents References